Monday, 24 December 2012

Christmas Nail Art

Happy Christmas everyone!

I couldn't decided what design to do for the big day itself so I did a bit of everything!


As you can see I have a penguin, Santa Claus' suit, a Christmas tree, a snowman and a snowflake.

All of these are very easy to do -


Penguin
  • Paint your nail black
  • When this has dried paint a white circle at the tip of your nail
  • Add two small dots for eyes
  • Wait for this to dry, then add two smaller dots of black to complete the eyes
  • Then using an orange polish add a little triangle under the eyes and on the very tip of the white circle - these will be the penguins beak and flippers

Sunday, 16 December 2012

Candy Cane Inspired Nail Art

I have been working my way through some Christmas designs and have been really pleased with the results so far!

I think this week's are my favourite that I have done though.  I was thinking of Christmas things that could inspire my nail art and I decided that candy canes would look fab.  Rather than go for red and white stripes I wanted to take a different approach.

Candy-cane-watermarbled-nail-art.jpg
 
 
This design was very easy to create, but very messy with watermarbling!  I painted three of my nails in Bright Red by Barry M and added my Collection 2000 sparkle top coat.  I love the top coat because the glitter is so fine but so pretty.
 
I painted my ring finger and thumb with a base of  white polish, I used Sally Hansen.  Leave this to dry and then comes the messy part.  To do water marbling you need a cup of room temperature water and your polishes.  New polishes work best.  You can use as many colours as you like, but you need to work quite quickly.  Drip your first polish on the surface of the water, I let a few drips fall to make sure I had enough.  The polish will start to spread out on the surface of the water.  Then add some drips of your other colour.  Then taking a tooth pick draw some swirls or stripes into the polish on the surface of the water.  When you are ready bend your finger placing the nail directly down onto your swirled polish, then straighten your finger straight down into the water.  You will see that there is polish still on the surface of the water.  Before removing your finger you need to get rid of the polish from the surface otherwise you will ruin your design.  Blow gently on the polish on the polish on the water, then using your tooth pick swirl it around on the surface and the polish will start to stick to the tooth pick.  Once the polish has gone from the surface of the water you can carefully remove your finger from the water.  You will have a lot of polish all around your nail and on your finger, which can look a bit scary, but all it takes is a cotton bud dipped into nail polish remover to take it off.  To help with this you can also use Vaseline around your nail and on your finger to stop the polish sticking so much.
 
Repeat those same steps for each watermarbled nail and voila - you have candy cane inspired nails!  I finished these nails off, once they were dry and cleaned up, with a coat of the sparkle top coat.  What's great about watermarbling is that no two nails look the same so you never really know what you might get.
 
I hope you like them and maybe try out watermarbling yourself.  If you get stuck there are loads of videos on YouTube that will help you out.

Monday, 10 December 2012

Christmas Plaits Nail Art

My nails have got more Christmassy this week with some festive Christmas plaits.  I first saw these plaits (or fish tail) nails a while ago now and tired them when I first saw them as the effect was something quite different from things that I had seen before.  But now getting round to Christmas designs I thought I would give them another go in festive colours.

Christmas-plaits-nail-art.jpg


I decided that I wanted to create the plait design on my thumb nail and ring finger,so I painted the other three fingers with silver from Models Own.  I had already picked white, red and green to be the colours for the plaited nails.  To start off the plaits I painted the nails on each hand with white and left this to dry.  Taking my next colour I then painted a diagonal stripe.  I again left this to dry.  Taking my third colour I made a diagonal stripe in the other direction.  Leaving each stripe to dry in between I then just continued down my nail alternating my three different colours until I reached the tip of my nail.

This can take a while, but I think the effect is worth it in the end.

I hope you like this festive design and maybe have a go yourself!

Sunday, 2 December 2012

Icy Blue Snowflake Nail Art

It's that time of year again.  I am feeling Christmasy as the decorations have gone up today - YAY! My nails over the next few weeks will also be festive for the season.  I hope you enjoy.

This week as it has been rather frosty and cold I thought I would go with a design that matched the weather.  I went with snowflakes on an icy blue background.

Icy-blue-snowflake-nail-art.jpg


The base colour for this design is a gorgeous duck egg colour from Marks and Spencer with Collection 2000 sparkly top coat over the top.  This gives a beautiful base for the design as it looks like a snowy scene.  To create the snowflakes I used a dotting tool to make three small lines on each nail in the shape of a star.  I then added a dot of polish to the end of each of the lines to make it look like a snowflake.  Adding in extra dots makes it look like there is falling snow around each of the snowflakes.

This is a really cute and easy design to try.  If you don't have a dotting tool you can use a toothpick to get the same effect.

Check back soon for more Christmas designs - I am already planning some others!

Monday, 12 November 2012

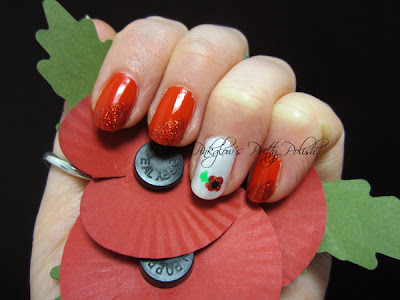
Remembrance Day Nail Art

To remember all those who fought for us I decided to do Remembrance Day nails.

This was a very simple design, but I think it looks great and is a lovely way to show support.

I painted my thumb and ring finger with a pearly white then the rest of my nails with red.  Then using a glittery red polish I created a poppy on my thumb and ring finger.  I did these by taking my dotting tool and adding four small dots close together and then pulling the polish into the centre to meet in the middle.  To finish off the poppy all you have to do is add a little black dot in the centre and a little green leaf.

To finish off the whole design I added a diagonal stripe of glittery red polish to all my red nails.

I used Barry M and E.L.F nail polishes for this design.


Remembrance-day-nail-art.jpg
 
 
Why not show your support and try out this design?

Tiffany & Co Nails

A while ago now I did a different Tiffany & Co. nail design that I have included in this post.  I had seen it on Pinterest and loved it so thought I'd give it a go.  For my first go at this design I used Orly Gumdrop as this was a pretty close match in colour, because living in the UK we don't have China Glaze (I had read up on dupes of China Glaze For Audrey).

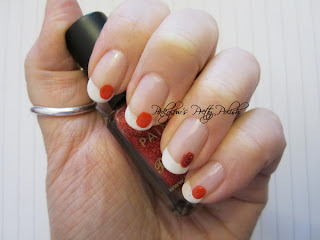
My mum went to America and I asked her to bring me back a For Audrey so that I could have another go again at the design with the perfect colour!  I didn't want to do exactly the same again for the design this time round so I decided to go with an accent finger painted in silver, the rest of my nails in For Audrey with silver tips. My thinking being that hopefully whatever might be in the Tiffany box/bag would be a lovely shiny silver.

I hope you like my Tiffany & Co. design

Tiffany-&-Co-nail-art.jpg
 
 
Here are my Tiffany nails the first time that I did them (Sorry that the photo isn't great - it's from my phone)
 
Tiffany-&-Co_nail_art.jpg
 

Sunday, 14 October 2012

Cut the Rope Nail Art

Hello all,

As many of us do I have games on my iPhone and one of my favourites is Cut The Rope.  My design this week has been inspired by Cut The Rope, and the Om Nom toy that I got for my birthday.  I hope you like it.

Cut-the-rope-nail-art


To create Om Nom and the Cut the Rope world was fairly simple.  I started with a base coat to protect my nails, and then painted them with an orange French tip manicure, other than my middle finger.  Once this had dried I created the stars that you have to try and collect before feeding Om Nom the candy in the game.  I used a yellow polish and a dotting tool to create five small dots close to once another and then dragged the nail polish into the centre to create the star.  I added one star on my little finger and two on my thumb. 
 
I then added a brown line on my index finger for the rope using a thin brush.
 
To create the candy I added a drop of orange polish and a drop of yellow polish to a scrap of paper and swirled them together slightly.  Using a cotton bud I dipped the end into the swirled polish and then dotted this on my ring finger nail.
 
I didn't have quite the right colour green to create Om Nom, so I mixed my green with some yellow to make it a lighter shade.  I then used a normal nail polish brush to create a green circle on my middle finger.  To create Om Nom's anteni, using my dotting tool, I added a small dot of the green above the circle and dragged the polish down to meet it.
 
Before adding Om Nom's eyes, smile and teeth, I waited for the green to dry.  For his eyes I used a cotton bud dipped into white polish and simply added two white dots close together.  Then I used a black striper for his smile and added smaller black dots in the middle of his eyes and smaller white dots for his teeth.
 
I hope you like my design and maybe have a go yourself.
 
I used the following polishes:
  • Maybelline - Orange Couture
  • Barry M - Yellow
  • Barry M - Spring Green
  • Barry M - Mushroom
  • E.L.F - White
  • Rimmel - French Rose
  • Andrea Fulerton - Black Striper
     
  •  

Monday, 8 October 2012

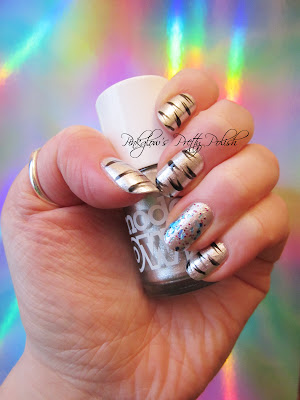
White Tiger and Glitter Nail Art

This week I was inspired by cutepolish.  She had posted a Glitzy Rainbow Tiger nail design and I really liked it.  I wanted to give the tiger stripes a go and I liked the glitter and stripe combo.  I didn't want rainbow tiger nails though, so I decided to adapt the design slightly and make it a white tiger design.

white_tiger_and_glitter_nail_art


To create this look I painted all my nails with Models Own Sterling Silver polish.  After this had dried, to create an accent nail on my ring finger, I topped the silver with Models Own Freak Out from the Glitterball collection.  To create the tiger stripes on the rest of the nails I used a black striper from Andrea Fulerton.  All you need to do is have a very small amount of polish on the brush, start at the edge of the nail and flick the brush towards the centre of the nail.  You then repeat the same steps again next to your first set of lines to make tiger stripes rather than just single flicks.  As always I finish off with a top coat to protect the design.

I hope you like my version of this cutepolish design.

Monday, 24 September 2012

Mini Flowers and Dots Nail Art

The nail art that I did this week was not what I had planned.  I had a bit of a disaster trying dry marbled butterflies (I think a bit of practise on some falsies is needed!).

Instead I did a different design to tide me over before trying the butterflies again.

Flowers_and_dots_nail_art
 
The flowers are very easy to create using a dotting tool. Dip the dotting tool into your chosen polish and add five dots in a circle.  Then drag the dots into the centre to meet each other.  You now have the basic pattern of the flower.  I created two flowers on my ring finger and then added pink glittery dots in the middle of each flower and some extra dots around the flowers.  On all the other nails I simply added a few dots along the line of my French manicure.

Monday, 17 September 2012

Models Own: Mirrorball Nails

Hello all,

So it was my birthday last week and I got lots of lovely presents, including nail varnishes!! Yay!

I was very lucky and got the Models Own Mirrorball collection, but they are all so gorgeous that I couldn't decide which one to try first, so instead I didn't choose! I used them all!!! One colour on each nail!

Mirrorball_models_own_nail_art

I love all the different glitters and when I move my hands all the different colours make it look like my nails are holographic!  The glitter particles in each colour differs from round glitter specs, glitter strips and glitter chunks making the look individual every time you use it.  The glitter is easy to apply and you get a fairly good coverage with one coat, although I would recommend two coats for a super sparkly finish.

From left to right starting with my thumb I am wearing
Boogie Nights
Dancing Queen
Disco Inferno
Hot Stuff
Freak Out
 
The black is Revlon Knockout

Enjoy x

Monday, 10 September 2012

Birthday Candle Nail Art


This week I have decided to create a very self indulgent nail design… It’s my birthday so what else, birthday candle nails!

Birthday_candle_nail_art
 

I didn’t want candles on every nail so decided to paint my nails Pastel Pink from Models Own apart from my ring finger.  This one I painted with a simple French manicure with a pink line to create the candle.

Once this had dried I added darker pink dots over my nails and on the pink line of the candle and added a small flame using a yellow polish and red glitter polish mixed together.

To finish off the whole look I used a glitter top coat for that extra special birthday shine.  You could of course do candles on all nails in different colours if you wanted to add more.

I hope you like this simple but fun look!

Sunday, 2 September 2012

Back to School Nail Art with Tutorial

It's that time of year again, it's time to go back to school.  When we think of this time of year there is an iconic symbol that always springs to mind... the apple.

The apple has inspired my new design.  I hope you like it and give it a go yourself by following my step by step guide.

Back_to_school_nail_art


What you will need:
  • Base coat
  • White polish
  • Nude polish
  • Red polish
  • Red glitter polish
  • Brown polish
  • Green polish
  • Top coat
  • Cotton buds
  • Nail dotting tool/thin paint brush
Back_to_school_nail_art
These are the polishes I used to create the look.
 
 
First, use a base coat to protect your natural nails and start the design by painting your nails with a simple French manicure.  Paint the tips white and leave them to dry and add a coat of a nude colour.
 
 
Back_to_school_nail_art
 
 
Leave this to dry before moving on to the next step.  To create the body of the apple I used red, but you could always choose green if you wanted.  I also decided to make one of my apples sparkle for that extra special look, but you don't have to do this if you don't want to.


Take your red polish and drip some onto a scrap of paper.  Using your cotton bud dip this into the polish and then add a red dot to your nail, slightly overlapping your French tip.  Continue this on all your nails.  I added the red glitter polish to my ring finger in the same way.
 
Back_to_school_nail_art


Again leave this to dry before moving on to the next step.  To create the stalk of the apple you will need to use the nail dotting tool or thin paint brush.  I have a double ended nail tool with both of these, so to create the stalk I used the brush.  As with the body of the apple drip some of your brown polish onto a scrap of paper.  Using your brush paint a small brown line moving away from the apple.
 
 
Back_to_school_nail_art


For the leaf I used the nail dotting tool, but you can use the brush if you want, just clean it using a small amount of polish remover on some cotton wool.

Drip a small about of your green polish onto your scrap of paper and using the dotting tool create a small dot by the brown line you just painted for the stalk.  Drag the dot in the opposite direction to create the leaves.  Do this on all your nails.

Back_to_school_nail_art


To finish, eave this to dry then add a thick layer of a top coat to protect your new design.  You now have a back to school manicure.

Enjoy.


Monday, 27 August 2012

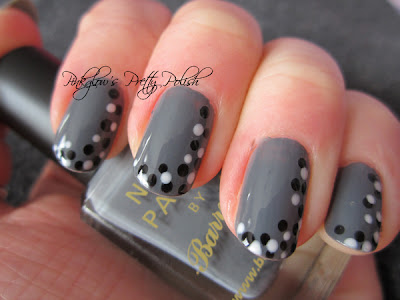
Grey Nails with Monochromatic Dots

I decided to have a go at a dotty manicure.  I have seen this done in a few different ways and with lots of different colours, but I thought a monochromatic style would be really effective.

Grey_nail_art_with_monochromatic_dots


This is a very simple look to achieve, but I think it looks really effective.  Just paint your nails in a solid base colour.  I used a Barry M nail paint here in grey.  Once your base colour has dried use a dotting tool (or you could use a toothpick) and add in dots starting near the nail bed, dotting down the side of the nail and moving down to the tip of the nail adding in a few more as you go.  I started with the black dots and then waited for those to dry before adding in the white.

Make sure you wait until your dots are completely dry and finish with a top coat to protect your design.

Hope you like my version and enjoy trying your own.

Next week I will be doing a back to school design - I hope you visit again to see it!

Tuesday, 31 July 2012

Olympic Rings Inspired Manicure

Living in London I have to admit that I was less than enthusiastic about the Olympic Games because I just thought it was going to be so disruptive to everyday living, however, now that it is here and I have watched it (on the TV) I have been enjoying what I have seen.  On that note I decided to do an Olympic Rings inspired manicure.

It is a very simple yet effective design, so I haven't done a step by step guide, however I will talk through what I have done to get this look.

These are the polishes that I used for my design.

Olympic coloured nail polish


There are the colours for the Olympic Rings in blue (L.A. Colors, Color Craze in Wired), yellow (Barry M in Yellow), black (Revlon in Blackest Black), green (Barry M in Spring Green) and red (Barry M in Bright Red).  For the base of this design I used a Rimmel London French Manicure in French Rose and Collection 2000 Sparkle Top Coat.

Olympic Ring Inspired Nail Art


I always start off with a base coat to protect my nails.  As a base I used my French manicure colour which is a really subtle, but pretty pink, after this had dried I then painted a coat of sparkle top coat to add the extra shine (to hopefully match that of medals!).  Then taking each of the colours of the Olympic rings I painted the tip of my nail, just as you would for a French manicure with each of the colours in the order of the rings.  I finished off with a clear top coat to protect the design.

I hope you agree that this is simple but effective.  Enjoy it if you have a go yourself.

Monday, 16 July 2012

Industrial Silver Sparkle Nails with Tutorial

Silver Sparkle Nails

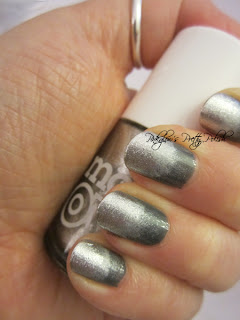
I thought I would do my nails to match the British summer sky - Steel grey and rainy! I think they have an industrial feel to them as well.  I really like the effect though and thought that you might like to learn step by step how to create this look.

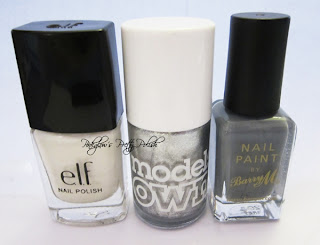
What I used to create this design:
- Make up sponge wedge
- Base coat and top coat
- Barry M nail varnish in Grey
- E.L.F nail varnish in Pearl
- Models Own nail vanish in Sterling Silver
- Cotton buds
- Nail vanish remover

ELF-models-own-barry-m-nail-varnish


Step one:

Apply a base coat to protect your nails from staining.  Then apply a coat of grey nail varnish and wait for it to dry.  Some of the Bary M nail varnishes are quite opaque so you might only need one coat.  It's up to you of course.  I applied one coat.

Silver-sparkle-sponge-nails-2

Step two:

Take a pearl or white varnish and drip some onto some scrap paper or similar.  Then using the corner of the make up sponge wedge dab it in the varnish and then over the tip of your nail about half way up.  The E.L.F nail vanishes come in lots of different colours and the pearl works really well here as it lets the base colour show through. Repeat this over all your nails and again leave it to dry.

Silver-sparkle-sponge-nails-3


Step three:

Repeat step two but this time using a silver glitter polish, only sponging onto the tip of the nail.  Models Own glitters are lovely and are fairly opaque so work well for this design.  Then dab off the sponge onto the paper, so barely any varnish remains.  Dab lightly over the remaining grey to create a very subtle small sparkle.

Once this is dry apply a top coat to protect your design and clean up any varnish from around your nails using a cotton bud and some nail varnish remover.

Silver-sparkle-sponge-nails-4


I hope you enjoyed this step by step guide and have a go at creating this look yourself!


Monday, 9 July 2012

Models Own: Beth's Blue and Ibiza Mix

Beth's Blue is a new colour that I got recently along with some others from Models Own and when I bought the new colours I got a free bottle of Ibiza Mix.  It's such a gorgeous glitter that I had to pair these two together.

Beth's Blue is a gorgeous power blue, with a hint of lilac in some lights.  It is also very easy to apply and you could get away with one coat as it is a very opaque polish.  I have two coats here as I just find this is more hard wearing.

I have added one coat of Ibiza mix over the top.

What do you think of this combination?

Models Own Beth's Blue Ibiza Mix Nails

Sunday, 8 July 2012

Valentine's Heart Nails

I made this design for Valentine's Day.  I wanted to do something different rather than the reds and pinks that you might normally expect to see.

I painted most of my nails black, leving the ring finger on both hands.  I did these using Barry M 'Red Glitter'.

Using a dotting tool on the nails I'd painted black I made two dots with the red glitter and dragged the polish together from these dots to create the heart shape.  I then repeated this step on the red nails using black polish, adding in some extra dots floating away from the heart.

Red and Black Valentines Nails

Green Glitter Army Nails

A green glittery army inspired nail design.  I used Models Own 'Peacock Green' and 'Emerald City' for this design.

Once the base colour is dry paint in a diagonal line across the tip of your nail with your chose glitter.  I finished this look using a black striper to add definition to the edge of the glitter stripe.

Models Own colours are really good for a design like this and they give a great coverage over the nail.

Green Glitter Army Nails Art Models Own

Purple Gradient Nails

This design is easier than it looks.  I used a selection of 4 purple nail varnishes and finally a black.  Paint a coat of the lightest shade of your chosen colour and leave it to dry.  Next drip a small amount of the next shade darker onto a scrap of paper. Using a make up sponge dab it on the nails leaving some of the lightest shade showing.  Repeat these steps until the very tip of your nail.

I finished this design with a coat of Nicole by OPI's 'Let's Get Star-ted'.

Purple Gradient Nail Art


Pink and Black Nails

These are very simple pink and black nails.  Just paint the whole nail a pink, I used Revlon 'Fuchsia Fever'.  Leave this to dry and then take a black polish, I used Revlon 'Blackest Black', and paint this over the tip of the nail in a diagonal line.

After this I took a dotting tool and added small dots in pink over the black stripe and then added a nail art sticker to my thumb nail to finish off the look.


Pink and Black Nail Art Revlon

Related Posts Plugin for WordPress, Blogger...