Showing posts with label Green. Show all posts

Monday, 1 June 2015

Nails Inc with In Style Magazine

Whilst shopping at the weekend I noticed that there were lovely Nails Inc polishes in with In Style magazine, so I would have been silly to walk away from such a good offer.

Nailsinc-the-tide-is-high-with-magazine.jpg

There are four different colours to choose from, but I was good and just picked up one, The Tide is High.  It's a really pretty minty greenish blue.

I had a pretty busy weekend as I was wedding dress shopping (yay - so exciting!), but it did mean that I didn't have much time to do anything too fancy with my nails, so I thought I'd try this colour out.

Nailsinc-the-tide-is-high.jpg

It's a really pretty colour and will be brilliant over the summer.  I find it really difficult to leave nails plain so I added a coat of Models Own Micro Dots over the top, which I think works really well as the green flecks in it really compliment the base colour and the rest give a nice contrast.

Just a quick post this week, but I have an exciting nail swap coming up soon, so keep an eye out for that soon.

Thanks for stopping by
Aimée x

Monday, 8 December 2014

Simple Festive Glitter Nails

Hi all,

Christmas is one of my favourite times to do nail art, oh who am I kidding?  Any time of the year is my favourite time to do nail art, and there will be some more Christmas designs coming up on my blog soon, but sometimes it's nice to go with something a bit more subtle, but still with a festive feel.

Essence-Roller-Coaster.jpg

I paired Essence Roller Coaster with Nina Ultra Pro Holographic Top Coat.  This is a great green for Christmas, it has a fine glitter running through it and a nice shine.

Nina-ultra-pro-holographic-top-coat.jpg

If you want to add some extra shimmer to your festive colour then I would recommend this Nina Ultra Pro top coat.  It's jam packed with different sized glitter fleck and it really catches the light. There is a video over on my Instagram from when I used this on a glitter gradient before.

What are your favourite shades to wear over the festive period?

Thanks for stopping by
Aimée x

Monday, 10 November 2014

Remembrance Day Poppy Nail Art

Hello all,

This year, as you know, marks the centenary of the First World War, so it seemed only right that I should show my support for the armed forces by having poppies on my nails.

Poppy-nail-art-2.jpg

At the weekend I got three of the new Models Own HyperGel colours and I couldn't wait to try one of them out.  I chose to use Ebony Green along with Red Lustre, one of the original HyperGel colours, and Snow White, to create my Remembrance Day nails.

I started off with a base of the green on just my middle nails, the red on my index finger and little finger, and white on my thumb and ring finger.  All nails have two coats and a top coat.  Once this had all dried a used a thin striper brush to create the poppy stalks on my white base.  I dropped some polish onto a scrap of paper, and so that I didn't overload the brush with polish I pulled it gently across the polish picking up a small amount of colour at a time.  I then carefully dragged the brush down my nail, from cuticle to tip to create the stalks.  I added a few thicker lines, and used a dotting tool to create buds.  I then used my dotting tool again to create tiny red flowers amongst the stalks.


Poppy-nail-art.jpg

I wanted to create the look of poppies in a field, rather than the traditional poppy you might buy and pin to your coat.  Overall I am not sure how I feel about the finished look.  It's not quite how I imagined it when I was planning, but I don't think it's because of the poppies, I think it might be because the colours look very Christmassy.  What do you think?

Thanks for stopping by
Aimée x

Monday, 15 September 2014

Cherry Nail Art

Hi all,

I wasn't sure what to do on my nails this week and I was lacking inspiration overall, but I just didn't want to go for a plain colour.  I had seen someone (I'm really sorry I can't remember who) post some cute cherry nails a while ago somewhere on social media so thought I'd give them a go myself as they'd be cute and quite quick.

Cherry-nail-art.jpg

I was away for the weekend so didn't have all my nail bits with with so borrowed this OPI Big Apple Red for my main colour.  I don't normally go for red nails as I'm not sure they're really 'me', but this colour works really well for my design.  

Originally, I used Orly White Out and China Glaze Emerald Sparkle for my base for my cherries and the stalks, but my top coat made a big smudgy mess!  I wasn't happy so I took the the polish off those two nails are started again when I got home.  I ended up using Models Own Snow White and Barry M Spring Green.

Overall I'm not sure how I feel about this design.  Perhaps it's because I wasn't overly inspired this week, so the idea didn't transfer from thought to nail quite as imagined? What do you think?

Thanks for stopping by
Aimée x

Monday, 8 September 2014

Multicoloured Dots Nail Art

Hi all,

I don't know about you, but I'm still not quite ready to say goodbye to bright colours, and this week I couldn't decide which one to use, so I used them all!

Multicoloured-dots-nail-art.jpg

When I'm short of time my go to nail art of choice is polka dots.  I used my Models Own dotting tools to create various different sized dots for this design.  I started with a base of Models Own Snow White.  I have been using this so often recently, so much so that I just finished a bottle of it, and I don't think I've ever finished a bottle of polish, ever!  Usually they go gloopy before I can get to the end,  It's just fabulous and such a brilliant white to work with.  I then used lots of other polishes that to complete the look.

Orange - Graffiti Nails Tuscany
Green - Essence Roller Coaster
Blue - Miss Sporty Pop Fiction
Purple - Morgan Taylor Bright Side
Pink (pictured) - China Glaze Purple Panic

I have just had a bit of destash and said bye bye to 19 polishes.  I originally thought it was going to be really difficult to go through and get rid of some, but it was much easier than anticipated.  They were ones that had dried up a bit, or ones that I just wasn't going to wear again, but there were some in there that only just made the cut!  It was good to have a proper look through though and it meant I came across the Miss Sporty one and realised that I hadn't used it yet, so thought I'd début along with these other gorgeous colours.  Isn't it pretty?

Graffiti Nails and Essence have been a recent favourites of mine, so I had to include them, and I love the quality of China Glaze and Morgan Taylor.  Whilst they are on the pricier side for nail polishes I really do think you get what you pay for.  Every time I use these it's like using a brand new bottle of polish.

Overall I think this is a fun design and pretty eye catching; I've even had men at work admiring my nails today!

Thanks for stopping by
Aimée x

Monday, 7 July 2014

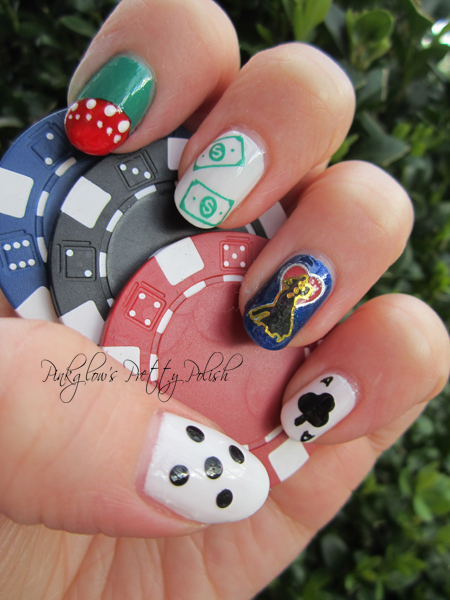
Welcome to Fabulous Las Vegas Nail Art

Hello all,

Last week I was contacted by Vegas.com, who are looking for inspiration for the perfect night out on the town.  The featured hotel this month is the Aria Resort which looks amazing and what better way to plan a manicure for a night out in Vegas than thinking about all the things that it's famous for and what's more famous than the casinos and the strip?

Vegas-nail-art.jpg

I decided to paint each nail differently but still following the theme.  On my thumb I have gone for a dice.  I used Models Own Snow White for the base (this is also the base for my middle and little finger) and then my Barry M Nail Art Pen in Black for the dots.  My index finger features a bright red poker chip.  I used Essence Roller Coaster for the base to look like the green felt of the table.  Once that was dry I painted on a white semi circle on the tip of my nail, this was so that when I painted on Barry M Bright Red the colour would really pop.  I then used my White Nail Art Pen to add in the detail.  My middle finger is stamped with a dollar stamp from my MoYou London Tourist Plate 02 (shhhh, it's actually the New York themed one, but no one has to know!).  When thinking about Vegas, I thought of the wedding chapels.  I used a base of Essence It's Raining Men, which has a beautiful shimmer, I then added a nail art sticker of a silhouetted couple with a heart, to represent a couple getting married under the stars.  My little finger nail is the ace of clubs.  I did the details with my black nail art pen.

I think my nails are all set for a night out in Vegas... What do you think?

Aria Resort Vegas - Photo from Vegas.com

Now all that's left is to actually go! One day....

Thanks for stopping by
Aimée

Monday, 16 June 2014

Graffiti Nails: Pistachio with Reverse Glitter Gradient

Hi all,

After using my first Graffiti Nail polish last week, I couldn't wait to use another one.  They are such pretty colours.  This week my manicure features Pistachio.

Graffiti-nails-pistachio-and-glitter-nail-art.jpg

I did a bit of mix and match manicure using two coats of Graffiti Nails Pistachio on my thumb, index, and little finger.  On my middle finger and ring finger I have used two coats of Models Own Snow White.  To add a bit of sparkle all over on the white nails I added a coat of  Collection Top Coat Sparkle and a pale blue nail gem.

To create the reverse glitter gradient on my Pistachio nails I started by using Collection Top Coat Sparkle again, but rather than painting on a normal coat I wiped off as much polish as I could and dragged what remained about half way down my nail.  Then I have used Blizzard from Models Own for the chunky glitter. It's such a pretty glitter which is jam packed with large round hex particles, holographic squares and round glitter specks.  Again I wiped off as much polish as I could and painted that all the way down my nail.  This added a few particles of glitter all over the nail.  Then to add more to create the gradient effect I dabbed on a thick layer near the top of my nails placing the glitter where I wanted it.

I am really pleased with these nails and I just wish the photograph did the glitter justice.  The sparkle is amazing and really catches the light.  The Graffiti Nails polishes are beautiful and I have been very impressed with them.  Isn't this colour so pretty?  Have you tried any, I'd love to see what you have tried.  Leave me a link in the comments so I can take a peek.

Thanks for stopping by
Aimée x     

Wednesday, 5 March 2014

Models Own: Speckled Eggs* - Swatches and Comparison

Hello all,

I have a been lucky enough to get three of the new Speckled Eggs collection from Models Own to review (and a tube of yummy Mini Eggs - they didn't last long!).  This is a new collection of pastel shades perfect for spring, but with added black matte glitter particles in different sizes to give the speckled effect.  Now I don't know about you, but when these were first announced I wondered how similar the colours would be compared to other pastel shades from Models Own in the collections like Ice Cream Sundae and Fruit Pastels, so along with the swatched I got a bit of a comparison with the others where I have the corresponding colour.  Lets take a look shall we?

Models-own-speckled-eggs.jpg

Models-own-speckled-eggs-2.jpg

Left to right I have Goose,  Duck and Magpie.  Out of the three I have to say that Magpie is my favourite, so I'll leave that one to the end!

* Press sample - sent to me for review

Monday, 3 February 2014

Models Own: HyperGel Review* - Vintage Roses

Hello all,

I was very excited to get three Models Own HyperGels in the post to try out.  I was even more excited that the three that I got were my favourites of the 10 colours available! I got Cerise Shine, Blue Glint and Red Lustre.  My original plan was to swatch them all, but I was having nail art withdrawals so decided for something in between.

* Press sample - sent to me for review

Models-own-hypergel-roses-nail-art.jpg

The HyperGel polish is amazing! Normally I use at least two coats of polish, but I have only used one here.  The coverage is so even and opaque you just don't need anything more.  And look how gorgeously shiny it is.  I was very pleased with the drying time, I was expecting it to take quite a while as it's gel effect, but it was dry surprisingly quickly ready for my nail art.

As you can see I have used Cerise Shine on three fingers and Blue Glint as a background for my accent nails on my finger finger and thumb.  Simply using the normal polish brush I dabbed on three Cerise Shine splodges and waited for those to dry.  To add petals to my roses I used Red Lustre for shade (you can just about see it in the picture).  I also needed a highlight so I chose to use Strawberry Tart from the Fruit Pastels collection.  To create the petals I used a really small nail art brush and painted on two 'c' shapes in slightly different sizes and ant different angles.  I started off with the shade and then went in again in the same way with the highlight.  Then to finish my roses off all they needed were some little leaves.  I used Apple Tart, again from the Fruit Pastel collection.  So not only do my nails shine like I have had gels, but they smell yummy too!

I am really pleased with this design.  I think it's simple enough that you can still see the beauty of the HyperGel polishes but it's also really pretty and girly.

I am loving seeing what everyone has bought in the Models Own sale recently over on Twitter! Glad to see I am not the only polish addict around - leave me your links so I can see what you got!

Monday, 23 December 2013

Christmas Tree Dotticure Nail Art

Hello all,

I have my last Christmas nail art of the season and more importantly it will be what I have on my nails on the big day!

Christmas-tree-dotticure-nail-art.jpg

This was a 'pinspired' design this week.  This year I have seen lots of Christmas trees done with striping tape, so I was looking for something different and came across this pin.  I loved it so much that I just had to have a go.  Clicking through and reading the blog post about this I found out that it was inspired by another blogger as well, so it's really going around now!

I started off with two coats of Snow White from Models Own.  This is a fab white polish.  A bit streaky of first coat, but perfect in two.  I then used Barry M Red Glitter, China Glaze Emerald Sparkle and Models Own Bora Bora to create my dots.  Using different the two different end of my dotting tool for the large and medium dots and then end of a cuticle stick for the tiny dots.  I repeated this pattern on all my nails, but left my ring finger free for my Christmas tree.  For the tree I started by dotting Emerald Sparkle in a single dot in the centre of my nail just below the cuticle.  Then two dots at the tip of my nail to create a triangle pattern.  I then filled in the rest of the tree with some extra green dots.  I then added three Red Glitter dots for baubles and three Bora Bora dots for tinsel.  The star had to be something a bit special so I added a yellow gem to sparkle away at the top of the tree.  Then came the tricky part... Top coating without causing drag on the dots over the white! And look... It worked!!!!!!! Yay!!

I love how festive this manicure is and what was even better was that it was so simple!  I also did some nail art for my mum and sister as well...

A fancy swirly tree for my mum and snowflake for my sister.

Christmas-nail-art.jpg

I hope you all like my Christmas tree dotticure and have a very Merry Christmas x


Monday, 28 October 2013

Polish Party: Halloween - Frankenstein Nails

Hi all,

It's Polish Party time again - Yay!  This month's theme is Halloween... Well how could it not be?

I was a bit stuck for what to do, because you can often see a lot of the same things when looking at Halloween nail art, and whilst I haven't steered too far away from 'the norm', I hope I have come up with something a bit different.

I wanted to keep to the same colour pallet on all my nails as I didn't want too many colours all trying to compete with the others, so once I had decided on Frankenstein nails I chose the others based around that.  So obviously I had green and black.  I then paired those with silver and a bit of glitter.

Frankenstein-halloween-nail-art.jpg

I painted my thumb and ring finger in the limited edition green from Barry M that was out in the summer from Superdrug.  Then my middle finger and little finger are painted in Sterling Silver from Models Own. To finish off my base colours I used Knockout from Revlon on my index finger.

For the details on my silver nails I have done some simple stripes and dots.  I used the Models Own nail art pen for the stripes and a dotting tool dipped in my Revlon black polish.  On my index finger I kept it simple with a coat of Startlet by Jessica.  It's such a pretty multi toned glitter that would go with anything.

My thumb nail is a little bit more fancy.  I have done the ends of a plaited nail just on the tip.  I added a diagonal stripe in silver first and then another in the opposite direction in black.  As you can see from the photograph the silver over the green has actually gone a greenish gold colour.  It's a happy accident as I really like it, but obviously wasn't meant to be like that.

On my ring finger we have a not so scary, but rather cute Frankenstein.  I simply added some dots of black for his hair near my cuticle and then wiggled the polish around to create the cover required.  I then added two white dots for his eyes with a smaller black dot in the middle.  Using my nail art pen with striper I added his little stitched up mouth.

I really enjoyed doing this design even though it wasn't what I had originally planned.  Don't for get to check out the other girls taking part in Polish Party this month x

Monday, 21 October 2013

Rimmel Space Dust: Total Eclipse

Hello all,

I had to do a mid week nail paint last week, which I don't normally do, but I had used nail foil and unfortunately even with a top coat on it doesn't last long.

I has spotted Rimmel Space Dust polishes in Boots when I was in there looking for some other bits and had already mentally made a note to put them on my Christmas list because I love anything glittery!  Anyway, I need one less now as my mum happened to buy me one - Aren't mums the best!

Rimmel-Space-dust-Total-eclipse.jpg

This is Space Dust in Total Eclipse.  Its a pretty green textured polish with different sized and shaped glitter particles.  It has a duochrome effect, because in some lights it's really green and then in other lights you can see purple flecks.  When textured polished first started coming out I wasn't sure about them to be honest as I love to go for a smooth shiny finish, but they have really grown on me with the ones that I've tried now.  I really like the texture of the Space Dust as it's not too bitty, but still has the same effect.  I have added a top coat over the colour as I like a nice shine, but it didn't take away from the texture at all.  Now you're probably thinking that it's all very well that it's a pretty colour and a nice texture, but that it will be a pain to take off... well it's not! Woo!! I thought I was going to be scrubbing away for ages with cotton wool (I have run out of foil to use that method!), but I was pleasantly surprised and it was off in a flash.

Overall I would say that so far that this is my favourite textured polish and I look forward to trying the other colours in the collection.  Have you tried any? I'd love to see them if you have, leave me a link so I can take a sneaky look x

Sunday, 21 July 2013

Pastel Rainbow Ombré

Hi everyone,

I keep seeing lots of different ombré nail designs around and they are just so pretty for summer.  Normally when I do ombré nails I tend to use variations of the same colour and sponge each one on individually as you can see here, but most people seem to paint their colours on the sponge directly in stripes and then dab on the nails.  I had previously tried this design using my normal technique and failed miserably! They just looked a complete and utter mess.  So I ended up taking it off and doing something different that week.

I still wanted to try this design because I have seen a few different variations of it such as here on Pinterest and here on YouTube.  So here it is...

Pastel-rainbow-ombre-nail-art.jpg
 
 
I started off my pastel rainbow ombré, by painting all of my nails with a pearly white base.  I chose a pearly one because for some reason whenever I paint an entirely white base, I make such a mess and this time round I really didn't want anything to go wrong before I had even really started.
 
 
After my pearl base had dried I then got my Models Own Ice Cream Sundae collection and make up sponges ready.  I lined all my colours up with the tops already unscrewed so that I was realy to paint the stripes of colour directly on to my make up sponges.  I chose to use five sponges, one for each of the different ombré combinations on each of my nails.  I don't waste the sponges though as I cut off the end when I've finished and the polish is dry.  Then I can use it again afterwards.  I made sure the sponge was slightly wet before I painted on the polish so it didn't soak in too much before I had chance to dab it on to my nails.  This is what my work station looked like when I had finished all my nails.
 
Ombré-nail-art-prep.jpg
 
 
I started with my thumbs and chose yellow and green.  Yellow at the base of my thumb and green at the tip of my nail.  I then moved to my index finger and chose to continue with the green, this time at the base of the nail and I combined that with orange.  I continued using the previous nail tip colour on the base of the next nail, orange into pink, pink into blue and blue into yellow.
 
If you read my blog a lot you will know that I like glitter.  So to blend my colours and add that extra sparkle I used a coat of Rimmel Disco Ball.
 
I am really pleased with this design and it just goes to show if at first you don't succeed, try try again x


Monday, 3 June 2013

Camouflage Nail Art with Tutorial

Hello all,

I was bought camouflage colours ages ago but haven't ever got round to using them so I thought it was about time.  I also haven't done a step by step for ages, so I have done one for these nails.

Camouflage-nail-art.jpg


The colours that I have used are Mushroom by Barry M, and Becca's Brown, Grace Green and Mushroom (I will now add MO after this when referring it to it in the rest of this post) all by Models Own.

I decided that I wanted to do the camo print on my ring finger and thumb and then use the three colours that I used for the camo print on the other three fingers.

Monday, 13 May 2013

Sinful Colors: Nail Junkie with Stripes

Hello all,

This weekend saw some more nail vanish purchases as you may have seen from my Twitter or Facebook page.  I couldn't resist the Models Own Bottleshop and the launch of the new Splash Polishes.  I had my eye on Golden Shore since I had seen the press pictures of the Splash Polish collection.  I was lucky enough to pick out a 'prize' ticket in the lucky dip at the Bottleshop at got a make up bag with attached mirror.  I also got a Sinful Colours polish in Nail Junkie.


Sinful-colours-nail-junkie-and-models-own-golden-shore.jpg


I decided to use my Sinful Colours polish for my design this week, but I have something in mind for Golden Shore next week.


Sinful-colours-nail-junkie-with-stripes.jpg


I wanted to have a go at a tape manicure with the colour peeping through and I thought Nail Junkie was perfect for this.  I was originally going to do the taping on all my nails, but I wanted to let the glitter shine away, so opted to just do my thumb nail and ring finger.

To create this look I first painted all my nails with my base colour and left it to dry.  I added a top coat over this to smooth it out as the glitter is quite chunky and gritty.  After this had dried I added four strips of nail tape across each of my accent nails and painted over the strips in a coat of black polish.  Before this is dry you lift the tape away from the nails following the pattern that you have stuck the tape in.  I used tweezers to add and remove the tape as it can be quite fiddly otherwise.  I finished off with a top coat to protect my design.

I think I did well for my first go at a tape manicure where you remove the tape, I'll have to try some different colour and pattern combinations in the future as it was a lot of fun to do.  I'd love to see your tape manicures if you have had a go, leave a link in the comments so I can take a look.

This week I am very excited as tomorrow is the day I will be in Look magazine - I'll be itching to get away from work as quickly as possible so I can go and get my copy x


Tuesday, 7 May 2013

Turquoise Stone Nail Art

Hello all,

I went for a 'Pinspired' manicure this week from Pinterest.  I have been seeing lots of pretty designs and thought that I would give one a go.

I have the gorgeous For Audrey from China glaze and having done a couple of different Tiffany & Co. designs with it, I was searching for something else to use it for.  I spotted Turquoise Stone nails and they were just perfect! I saw them done a few different ways but here is the pin that I got my main idea from.


Turquoise-stone-nail-art.jpg
 
 
Now I don't know about you, but I hate cling film! It clings to everything that it's not meant to and nothing that it is; mainly itself which is very frustrating!  This is the perfect revenge for cling film though as you just lightly screw some up and use it to dab on the colour.  I just dabbed the cling film into black polish from Revlon and removed the excess on a scrap of paper and then dabbed it all over my nails.  You can see the steps on the pin that I followed, but I didn't copy it like for like as I wanted to add my own touch.  I also thought that painting on the thin lines might look too overdone. 
 
I had seen some other pins that did the dabbing of colour with gold polish instead, so I thought that I would add a little bit of gold as well.  After the black had dried I dabbed Models Own Bora Bora over all of my nails using the cling film as before.  This added a slight sparkle like you can see in turquoise stones.
 
Before I was lucky enough to get China Glaze For Audrey I had tried some other polishes as dupes for the colour.
 
China-glaze-for-audrey-dupes.jpg
 
Here you can see China Glaze For Audrey, Orly Gumdrop and Marks and Spencer Duck Egg.  Duck Egg was the first one that I had and whilst I love the polish as you can see from how much has been used, it's not the best dupe for For Audrey.  It's much lighter and very shimmery.  I was bought this when looking for dupes and it seemed right at the time until looking at pictures afterwards.  I must say that if you are looking for a light pretty blue/green I would recommend Duck Egg as it's just lovely.  Having then searched online for dupes I found Orly Gumdrop.  It's a really good dupe if you can't get your hands on China Glaze.  As you can see it is slightly lighter, but it's not at all bad.  Have you found any good dupes for this or other colours?
 
 
I'm really pleased with the finished effect of my turquoise stone nails.  What do you think? Are you on Pinterest? Have you tried any designs from there?


Monday, 1 April 2013

Fruit Pastel Double Dot Dotticure

Hello all,

The last time I did a full dotticure it proved to be very popular and is still the most popular post on my blog, you can see it here if you want.

I thought I would go for another dotticure for spring using Models Own Fruit Pastels.  These colours are perfect for spring, and they smell delicious! Each one has a fruity scent that compliments their colour.

Fruit-pastel-double-dot-nail-art.jpg


I have done this double dot dotticure using Grape Juice, Strawberry Tart and Apple Pie.  It's a very simple look to achieve.

Start with your base colour, I couldn't choose which one I wanted to use, so I used all three colours that I have from the collection.  Once the base colour is dry (I always use two coats) add some white dots at the edge of your nails using a dotting tool.  If you don't have a dotting tool you can always use the end of a tooth pick for small dots or a cotton bud for quite large dots.

Leave the white dots to dry and then to create the double dot look use the same colour as your base in smaller dots over the white ones you have just created.  To finish off the look I added some more small white dots to fill in some of the gaps and add a bit more of another colour into my design.

I haven't found a Models Own colour yet that doesn't give a good coverage and the Fruit Pastel is no exception.  They are very creamy pastel colours.  As I said earlier the colours all have a smell to compliment their colours.  Grape Juice is the least scented of the three that I have, but has a pleasant grape smell.  Strawberry Tart smells a little like strawberry sweets and apple pie smells almost like an apple body wash.  Using them all together my nails smell like sherbet.

I hope you like my design and give it a go yourself x

Sunday, 24 March 2013

Easter Chick Nail Art with Tutorial

Hello all,

You might have seen last week that I did the first of two Easter designs with my Strawberry Tart Bunnies.  This week I have Easter Chicks with a sparkly speckled egg effect.

Easter-chick-nail-art.jpg
 
I have used mainly Models Own nail polishes to create my design.  The base colour is Lemon Meringue and the orange for the chick's beak is Fuzzy Peach.  Both of these are from the Ice Cream Sundae collection.  For the sparkly speckled egg effect on my other nails I have used Disco Inferno from the Mirrorball Collection.
 
I have created a step by step picture guide to show you how I created this look, and hopefully it's easy for you to follow if you want to have a go yourself.


 Step one - After using a base coat to protect your nails, paint them with two coats of your base colour, in my case Lemon Meringue.
 
Step two - This is where you will start to create the shell for you little chick to sit in.  Using a dotting tool create a zig-zag line across your ring finger nail in white.  You do not need to wait for this to dry before moving on to step three.
 
Step three - Fill in the rest of the shell for your chick using your white polish (I have used Sally Hansen White On)
 
Step four - Add a small orange triangle above your shell and two black dots for your chick's eyes.
 
You could finish your design here if you wanted to, add more chicks on your other nails or like me, add on some glitter to the other nails.  I used Disco Inferno because of the colours in the glitter adding to the chick theme with gold, orange and green flecks.
 
I will be putting together a step by step of my Easter Bunny nails as well, so keep an eye out for that if you are interested x

Monday, 11 March 2013

Models Own: Ice Neon and Fruit Pastels

Hello all,

Models Own have some new collections and they have a campaign to see which team you are on with #neonVpastel.  I just couldn't choose a 'team' as they are both so nice, so I got three from each collection!

Today I will be reviewing Pink Punch from the Ice Neon collection.

Models-own-ice-neon.jpg


These are the Ice Neon colours that I got, from left to right, Pukka Purple, Toxic Apple, and Pink Punch.  They are called neon for a reason, the colours are so bright and vibrant.  Models Own suggest that to keep these polishes at their brightest they are best stored in the fridge.  You don't have to though - it's up to you.  I'm not as I am sure they will be bright enough anyway.


Models-own-ice-neon-pink-punch.jpg

Although this is labelled as Pink Punch, I have to say I originally thought it was orange.  Depending on the light the look can change.  I would say that this is more of a coral pink, but Models Own do have Bubblegum, a bright highlighter pink in the Ice Neon collection as well.

The polish goes on nice and smoothly with very little streaking.  I always tend to use two coats of polish as I find it lasts better, but you could get away with just one coat of this if you wanted.  The neon's dry with a matte effect, but I found that this was not at matte as other polishes that give the same effect.  There was still some shine to the polish when it was dry, but if you wanted to keep the matte effect you could use a matte top coat to protect the colour, but still keep the effect.  I am not keen on matte nails, I like a bit of shine, so I used my normal top coat to give the shine you can see here.


I would recommend the Ice Neon collection if you want a super bright manicure to help bring on that summer feeling early!

Monday, 28 January 2013

Painted Flowers Nail Art

Hello all,

It's been pretty wintery and cold recently and I thought to cheer myself up that I would take some of my new colours that I got for Christmas for a spin and create a design inspired by spring.

Painted-flowers-nail-art.jpg


I couldn't decide which of my pastel shades I wanted to try first, so in the end I used all three!  I painted three nails on each hand in Jade Stone and two in Fuzzy Peach.  The centres of my daisy like flowers are done using Lemon Meringue.  These three are all Models Own colours.  For the white of my flowers I used Sally Hansen White Out.
 
These are very simple flowers, more simple than they look.  After applying two coats of my base colours, which are gorgeous candy-like pastel shades, I used a small brush dipped in the white polish and just pushed the bristles away from the nail edge towards the centre of my nail.  I did this a few times to create my basic flower shape.  I didn't want a full flower of each nail as I think this could be too much.  I placed my flower a different points on each nail to mix up the design.  When my petals were dry I added a large yellow dot in the centre using a dotting tool.
 
I really like the outcome of this design and I hope you do too. Let me know if you have a go at a bright and colourful nail design to brighten your winter days.
Related Posts Plugin for WordPress, Blogger...