Showing posts with label Grey. Show all posts

Monday, 28 May 2018

Grey with Silver Stamping

When a combo just goes right

Grey-with-silver-stamping.jpg

Base - Barry M - Grey
Stamping - MoYou - Silver Dust
Stamping Plate - UberChic 14-02

Friday, 18 September 2015

Jacava Woodlanders Collection AW15* - Jacava Competition Announcement

Jacava have gone and done it again - they have released seventeen brand new shades in their Autumn/Winter 2015 collection and they are bar far my favourites out of their entire range.  Autumn is my favourite season and I am partial to a dark nail, so when I was asked to review some of the new shades I jumped at the chance.  Make sure you read on to find out about Jacava's competition to win all 17 Woodlanders shades!

Jacava-woodlanders-AW15-review.jpg

*Press sample - sent to me for review

Monday, 3 June 2013

Camouflage Nail Art with Tutorial

Hello all,

I was bought camouflage colours ages ago but haven't ever got round to using them so I thought it was about time.  I also haven't done a step by step for ages, so I have done one for these nails.

Camouflage-nail-art.jpg


The colours that I have used are Mushroom by Barry M, and Becca's Brown, Grace Green and Mushroom (I will now add MO after this when referring it to it in the rest of this post) all by Models Own.

I decided that I wanted to do the camo print on my ring finger and thumb and then use the three colours that I used for the camo print on the other three fingers.

Monday, 27 August 2012

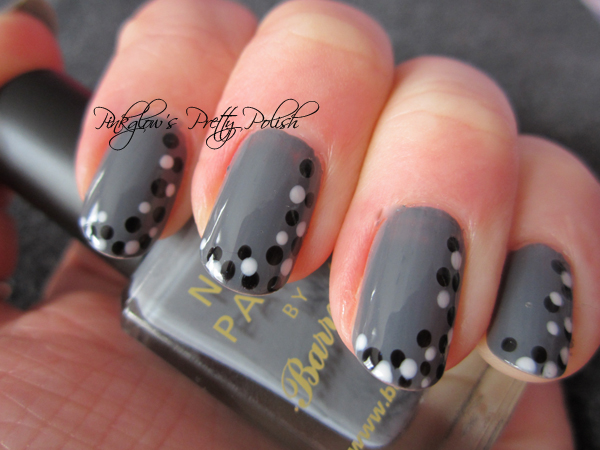
Grey Nails with Monochromatic Dots

I decided to have a go at a dotty manicure.  I have seen this done in a few different ways and with lots of different colours, but I thought a monochromatic style would be really effective.

Grey_nail_art_with_monochromatic_dots


This is a very simple look to achieve, but I think it looks really effective.  Just paint your nails in a solid base colour.  I used a Barry M nail paint here in grey.  Once your base colour has dried use a dotting tool (or you could use a toothpick) and add in dots starting near the nail bed, dotting down the side of the nail and moving down to the tip of the nail adding in a few more as you go.  I started with the black dots and then waited for those to dry before adding in the white.

Make sure you wait until your dots are completely dry and finish with a top coat to protect your design.

Hope you like my version and enjoy trying your own.

Next week I will be doing a back to school design - I hope you visit again to see it!

Monday, 16 July 2012

Industrial Silver Sparkle Nails with Tutorial

Silver Sparkle Nails

I thought I would do my nails to match the British summer sky - Steel grey and rainy! I think they have an industrial feel to them as well.  I really like the effect though and thought that you might like to learn step by step how to create this look.

What I used to create this design:
- Make up sponge wedge
- Base coat and top coat
- Barry M nail varnish in Grey
- E.L.F nail varnish in Pearl
- Models Own nail vanish in Sterling Silver
- Cotton buds
- Nail vanish remover

ELF-models-own-barry-m-nail-varnish


Step one:

Apply a base coat to protect your nails from staining.  Then apply a coat of grey nail varnish and wait for it to dry.  Some of the Bary M nail varnishes are quite opaque so you might only need one coat.  It's up to you of course.  I applied one coat.

Silver-sparkle-sponge-nails-2

Step two:

Take a pearl or white varnish and drip some onto some scrap paper or similar.  Then using the corner of the make up sponge wedge dab it in the varnish and then over the tip of your nail about half way up.  The E.L.F nail vanishes come in lots of different colours and the pearl works really well here as it lets the base colour show through. Repeat this over all your nails and again leave it to dry.

Silver-sparkle-sponge-nails-3


Step three:

Repeat step two but this time using a silver glitter polish, only sponging onto the tip of the nail.  Models Own glitters are lovely and are fairly opaque so work well for this design.  Then dab off the sponge onto the paper, so barely any varnish remains.  Dab lightly over the remaining grey to create a very subtle small sparkle.

Once this is dry apply a top coat to protect your design and clean up any varnish from around your nails using a cotton bud and some nail varnish remover.

Silver-sparkle-sponge-nails-4


I hope you enjoyed this step by step guide and have a go at creating this look yourself!


Related Posts Plugin for WordPress, Blogger...