Monday, 29 December 2014

W7 Nail Polish and Cosmic Nail Dust Review*

Hello all,

I hope you've had a great Christmas and got some lovely nail goodies under the tree.  We now of course have the countdown to the New Year, and it's another perfect excuse for super glittery nails.  I was asked to review some colours and glitters from W7 Cosmetics and thought that this would be the perfect reason to show them off.

W7-pink-cosmic-nail-glitter.jpg

*Press sample - sent to me for review

Monday, 22 December 2014

Christmas Tree Nails with Born Pretty Store Nail Stud Review*

Hello all,

It's nearly here, only three more sleeps!  With that in mind, it seemed like a really good time to do some more Christmas nails.  I decided to go with cute and colourful Christmas trees featuring gold and neon nail studs from Born Pretty Store.

Christmas-tree-nail-art.jpg

*Press sample - sent to me for review


Monday, 15 December 2014

I Heart New York Nails

Hello all,

I have been fairly quite on social media since the week before last because I was away, so it seems like ages since I last posted anything properly, but this week I wanted to share with you my nails to match my holiday.

I'm sure you've guessed from the title of the post where I went; the fabulous New York.  And it's true, I really do love it!

I-heart-new-york-nail-art.jpg

I used my MoYou Tourist 02 plate for a quick, but super effective design.  I have been to New York before and visited The Statue of Liberty, but this time I was lucky enough to get tickets to go inside and stand on the plinth (I just missed out on crown tickets - drat!).  I thought it was only fitting that I stamp Liberty herself on my thumb nail on one hand.  And what better background for my picture?

I-heart-new-york-nail-art-2.jpg


On my other hand I decided to stamp the American flag.  This is the first time I have tried stamping where I've coloured the design with different polishes.  I don't think I did too badly, but there is room for improvement.  Has anyone got any tips for how best to scrape the excess polish away when doing this so the colours don't all blend?

Times Square was the backdrop for this hand and it's a must do visit if you haven't been before.  There are so many lights, so if you're anything like me and love anything sparkly or shiny, it's the place to go.

I used a white base on all nails with Models Own Snow White, which has been my go to polish of the year I think.  It's been the only colour nail polish that I have ever used a whole bottle of before it's gone gloopy.  I stamped the I heart NY on my other nails using Graffiti Nails Jet and Barry M Red.

And just because I do love New York so much here's a quick picture from my trip

New-york-skyline.jpg

Thanks for stopping by
Aimée x

Monday, 8 December 2014

Simple Festive Glitter Nails

Hi all,

Christmas is one of my favourite times to do nail art, oh who am I kidding?  Any time of the year is my favourite time to do nail art, and there will be some more Christmas designs coming up on my blog soon, but sometimes it's nice to go with something a bit more subtle, but still with a festive feel.

Essence-Roller-Coaster.jpg

I paired Essence Roller Coaster with Nina Ultra Pro Holographic Top Coat.  This is a great green for Christmas, it has a fine glitter running through it and a nice shine.

Nina-ultra-pro-holographic-top-coat.jpg

If you want to add some extra shimmer to your festive colour then I would recommend this Nina Ultra Pro top coat.  It's jam packed with different sized glitter fleck and it really catches the light. There is a video over on my Instagram from when I used this on a glitter gradient before.

What are your favourite shades to wear over the festive period?

Thanks for stopping by
Aimée x

Monday, 1 December 2014

Barry M: Glitterati Socialite

Hello all,

With the party season here glitter is always a good choice.  I tried out Socialite a few weeks ago, but haven't had chance to post about it yet.

Barry-m-socialite.jpg

This was one of those essential buys in Boots to make up my total cost for bonus points.  It just had to be done, you know how these things are!?

I love this colour and I think it would be brilliant for Christmas parties paired with a black dress.  It has a slight texture to it because of the dense glitter, but if you use a top coat over it, it smooths out.

Barry-m-socialite-2.jpg

I was lucky enough to be able to catch it glistening in the sunshine and look how pretty it is.

What other colours from the Glitterati collection would you suggest?

Thanks for stopping by
Aimée x

Monday, 24 November 2014

Models Own: Asscher Blue with Snowflakes

Hi all,

It has become something of a tradition for me to do a snowflake design each year, so with the weather turning very frosty and cold today I thought it was very fitting to add some festive flakes to my nails.

Models-own-asscher-blue-snowflakes.jpg

I picked Models Own Asscher Blue as my base.  This is perfect for a wintry look because of the diamond dust in it.  I then used a thin striping brush with Snow White to paint asterisk star shapes on all of my nails.  I wanted quite big snowflakes so I only had room for one per nail.  I wanted to add in details on each snowflake, so I used a dotting tool to add a dot at the end of each line, and then used a tiny paint brush to create little lines under each dot.

To finish off I added in a few extra dots where there were some spaces on my nails and a pale blue nail gem in the middle of each flake.  I think when it comes to wintry nails you can't go wrong with extra added sparkle.

These are the best snowflake nails that I have done and I am really pleased with how they turned out. You can see the progression of the different ones I've done here.

Thanks for stopping by
Aimée x

P.S. It's also Polish Party time and my nails happen to fit in nicely with this months theme.  We had a tie this month between autumn and weather.

Don't forget to check out which theme the other girls chose and click through to their blogs to see their designs 

Monday, 17 November 2014

Models Own: Hyper Gel Pitch Purple with Reverse Glitter Gradient

Hello all,

I loved the Ebony Green HyperGel that I used last week so I just had to try one of the other new shades that I got.  I love darker shades in autumn and winter, and also it's the perfect excuse to add glitter to a manicure.  Ok, lets face it, I don't really need an excuse for that - If you read my blog regularly you'll know I'm partial to sparkly nails!

Models-own-hypergel-pitch-purple-glitter-gradient.jpg

This is such a gorgeous colour purple and the gel effect is brilliant.  It's so glossy even without a top coat.  I decided add a reverse glitter gradient using Jack Frost from the Wonderland collection and Banger from the Fireworks collection.  Both these glitters go really well together and with the purple.

I started by adding Jack Frost very sparingly on all nails so I was left with only a few particles of glitter.  I then went over this again, but only at the base of my nails by the cuticles.  Because Jack Frost is an iridescent glitter it works really well for a gradient as it takes on the main colour from the base polish.  I then topped this further with Banger.  The blues and pinks in this really compliment the purple.

What are your favourite combinations for glitter gradients?

Thanks for stopping by
Aimée x

Monday, 10 November 2014

Remembrance Day Poppy Nail Art

Hello all,

This year, as you know, marks the centenary of the First World War, so it seemed only right that I should show my support for the armed forces by having poppies on my nails.

Poppy-nail-art-2.jpg

At the weekend I got three of the new Models Own HyperGel colours and I couldn't wait to try one of them out.  I chose to use Ebony Green along with Red Lustre, one of the original HyperGel colours, and Snow White, to create my Remembrance Day nails.

I started off with a base of the green on just my middle nails, the red on my index finger and little finger, and white on my thumb and ring finger.  All nails have two coats and a top coat.  Once this had all dried a used a thin striper brush to create the poppy stalks on my white base.  I dropped some polish onto a scrap of paper, and so that I didn't overload the brush with polish I pulled it gently across the polish picking up a small amount of colour at a time.  I then carefully dragged the brush down my nail, from cuticle to tip to create the stalks.  I added a few thicker lines, and used a dotting tool to create buds.  I then used my dotting tool again to create tiny red flowers amongst the stalks.


Poppy-nail-art.jpg

I wanted to create the look of poppies in a field, rather than the traditional poppy you might buy and pin to your coat.  Overall I am not sure how I feel about the finished look.  It's not quite how I imagined it when I was planning, but I don't think it's because of the poppies, I think it might be because the colours look very Christmassy.  What do you think?

Thanks for stopping by
Aimée x

Monday, 3 November 2014

Barry M: Indigo with Flowers

Hi all,

I hope you all had a good Halloween and enjoyed some spooky nail art.  With the festivities over it was nice to do something different this week.

Barry-m-indigo-flowers.jpg

I paired Barry M Indigo with Lady from the Royal Textured Glitter collection.  I stamped these pretty flowers over the glitter using Pro Plate 09 from MoYou London.

I'm really looking forward to wearing some darker colours now that it's starting to get colder and the nights are drawing in.  What are your favourite colours to wear in the winter months?

Thanks for stopping by
Aimée x

Friday, 31 October 2014

Polish Party: Halloween - Zombie Nails

Hi all,

Last month you may remember that Polish Party turned one!  I can't quite believe that it's been that long and that more and more people want to join in all the time.  With the group being around for a year, that does mean that themes may once or twice get repeated... but with a theme like Halloween this month, I'm not at all surprised.  There are so many different designs you can do for it.  You can see my design from last year here.  I've tended to edge more on the cute side for my Halloween nail art before and you can see that with my Monstrously Mini nails as well.  This time round I decided to go for something a bit more gruesome with some zombie nails.

Zombie-nail-art.jpg

Monday, 27 October 2014

Monstrously Mini Halloween Nail Art Challenge

Hi all,

You may have seen last week that I created some cute glow in the dark ghosts for the  challenge created by Sara and Rachel.  I did these because I didn't think I'd be able to do all seven of the challenges.  As I thought about it more I decided that I really wanted to have a go, because otherwise it wasn't really a challenge. However I knew that I wouldn't have time to prepare a full manicure for each theme, so I planned out my designs and did a single nail on a nail wheel for each of them.

Monstrously-mini-halloween-nail-art-challenge.jpg


Monstrously-mini-halloween-nail-art-challenge-info.jpg

So the themes seem quite straightforward right? Wrong! It took me ages to decide what to do for each one.

Monday, 20 October 2014

Halloween Ghost Nail Art

Hello all,

I've made so many lovely nail friends over on Twitter so it's always extra exciting when I get an invitation to join in with a nail art challenge with some of them.  Sara and Rachel came up with the Monstrously Mini Challenge for Halloween.  There are seven different challenges, and I'm not sure that I will be able to do all of them, but I still wanted to join in if I could.  I didn't stick to any particular order and jumped right in with number six 'Your favourite creature'.  You can't think Halloween and not think ghosts.

Halloween-ghosts-nail-art-1.jpg

Monday, 13 October 2014

Essence: Thermo Effect Polish - It's Hot Stuff

Hello all,


I love to have fun with my nails, so if there's a polish that adds to the fun it's going to be likely that I want it!  I spotted Thermo Effect colours from Essence a while back on a European blog, but that was before Essence came over to the UK.  When they arrived here, I sent them a cheeky Tweet to ask if we would be getting them as well and I was told they would be here soon.  On my last trip to Westfield I popped into the shop, obviously, and spotted this gorgeous pink that I needed to try.

Essence-thermo-effect.jpg


Monday, 6 October 2014

Tiffany & Co Nails

Hello all,

Whilst I was out shopping at the weekend, I got distracted by something shiny... Glittery nail polish to be precise!  How could I not come away with nail polish when I was out for a girly day of shopping and the cinema with my mum?

I got an exciting new addition to my Essence collection which will feature on my blog soon, but what I have to show you today is number 184 from Laka.  It's the perfect green glitter to add to some Tiffany & Co. themed nails.

Tiffany-&-Co-nail-art-3.jpg

I have done Tiffany & Co. nails before (you can see them here) and they are just so cute to do; so I was excited to try out some more.

Monday, 29 September 2014

Polish Party: Birthday Celebrations - Candles and Glitter

Hi all,

If you read my blog regularly you'll know that Lauren, Madison, and I, along with some other wonderful nail girls decided to join together each month, come up with a theme and paint our nails. Well that was a whole year ago! It's weird to think that it started with a very small group and now there are 55 people involved with Polish Party.  What better way to celebrate than with birthday candle nails?

Birthday-candle-nail-art-with-glitter.jpg

I posted a plain swatch of Models Own Diamond Luxe Oval Plum last week and it was so pretty I didn't want to take it off.  So I decided to use it as a base for my birthday nails.

I started by stamping the candles from my MoYou Greek Mythology 09 plate in white.  After they had dried I filled in the pattern with pink and silver nail art pens from Barry M.  I finished them off my adding gold glitter to the flames.  I wasn't sure about them at first, but they have grown on me.  I didn't want to stamp on all nails so I used Hot Stuff from the Models Own Mirrorball collection.  It's just the perfect kind of glitter for this design as it looks like confetti.

Don't miss what the other girls come up with.  I'm super excited to see them all.  Follow their links below.

Thanks for stopping by
Aimée x


Models Own: Pear Purple and Stamping

Hi all,

One of my favourite colours is purple, and I love purple nails.  So it was only natural that I would be getting Models Own Pear Purple from their new Diamond Luxe collection.  I had a simple swatch of Oval Plum last week, and you can see how pretty this collection is with the real diamond dust shimmering away through the polish.

Rather than another simple swatch I decided to go for a bit of stamping and extra glitter.  If you read my blog regularly you know how much I love a bit of glitter!

Models-own-pear-purple-with-stamping-1.jpg


Monday, 22 September 2014

Models Own: Diamond Luxe Oval Plum

Hello all,

I've got a quick post today, but it shows off something super beautiful, the new Models Own Diamond Luxe Oval Plum.

Models-own-diamond-luxe-oval-plum.jpg

Look how pretty!!! As always with Models Own polishes it goes on really smoothly.  One coat of this gives full coverage and is more pink in tone, but I have used two coats here which gives a more magenta tone.

I also got Emerald Green, Pear Purple, and Asscher Blue, so I can't wait to try them out as well.

If you follow me on Instagram you will have seen that I've been organising my nail polish collection.

Nail-storage-part-2.jpg

You may have seen the first step of my storage sorting but I still wasn't 100% happy with what I had done and still had more to sort.  I spotted my new drawers in Muji, and they were exactly the type of thing that I had been looking for for a while.  I got two sets, and as you can see they are already full!! ha ha!  If you'd be interested in reading more about my storage as it is today leave me a comment and I can start putting a post together.

Thanks for stopping by
Aimée x

Monday, 15 September 2014

Cherry Nail Art

Hi all,

I wasn't sure what to do on my nails this week and I was lacking inspiration overall, but I just didn't want to go for a plain colour.  I had seen someone (I'm really sorry I can't remember who) post some cute cherry nails a while ago somewhere on social media so thought I'd give them a go myself as they'd be cute and quite quick.

Cherry-nail-art.jpg

I was away for the weekend so didn't have all my nail bits with with so borrowed this OPI Big Apple Red for my main colour.  I don't normally go for red nails as I'm not sure they're really 'me', but this colour works really well for my design.  

Originally, I used Orly White Out and China Glaze Emerald Sparkle for my base for my cherries and the stalks, but my top coat made a big smudgy mess!  I wasn't happy so I took the the polish off those two nails are started again when I got home.  I ended up using Models Own Snow White and Barry M Spring Green.

Overall I'm not sure how I feel about this design.  Perhaps it's because I wasn't overly inspired this week, so the idea didn't transfer from thought to nail quite as imagined? What do you think?

Thanks for stopping by
Aimée x

Monday, 8 September 2014

Multicoloured Dots Nail Art

Hi all,

I don't know about you, but I'm still not quite ready to say goodbye to bright colours, and this week I couldn't decide which one to use, so I used them all!

Multicoloured-dots-nail-art.jpg

When I'm short of time my go to nail art of choice is polka dots.  I used my Models Own dotting tools to create various different sized dots for this design.  I started with a base of Models Own Snow White.  I have been using this so often recently, so much so that I just finished a bottle of it, and I don't think I've ever finished a bottle of polish, ever!  Usually they go gloopy before I can get to the end,  It's just fabulous and such a brilliant white to work with.  I then used lots of other polishes that to complete the look.

Orange - Graffiti Nails Tuscany
Green - Essence Roller Coaster
Blue - Miss Sporty Pop Fiction
Purple - Morgan Taylor Bright Side
Pink (pictured) - China Glaze Purple Panic

I have just had a bit of destash and said bye bye to 19 polishes.  I originally thought it was going to be really difficult to go through and get rid of some, but it was much easier than anticipated.  They were ones that had dried up a bit, or ones that I just wasn't going to wear again, but there were some in there that only just made the cut!  It was good to have a proper look through though and it meant I came across the Miss Sporty one and realised that I hadn't used it yet, so thought I'd début along with these other gorgeous colours.  Isn't it pretty?

Graffiti Nails and Essence have been a recent favourites of mine, so I had to include them, and I love the quality of China Glaze and Morgan Taylor.  Whilst they are on the pricier side for nail polishes I really do think you get what you pay for.  Every time I use these it's like using a brand new bottle of polish.

Overall I think this is a fun design and pretty eye catching; I've even had men at work admiring my nails today!

Thanks for stopping by
Aimée x

Monday, 1 September 2014

Pretty In Pink Nail Art

Hi all,

Even though I love Autumn, I'm not quite ready to give up summery colours on my nails.  Having said that I wasn't quite sure what I was going to do on my nails this week, so when in doubt it's a visit Pinterest to look at all the pretty nails I have pinned there for inspiration.  Scanning through I decided to go for a version of this design, but in pink.

Pretty-in-pink-nail-art.jpg


I started with three coats of Ice Cream Sundae on my thumb, index and little fingers and two coats of Pink Flamingo on my middle and ring fingers.  Both colours are from Barry M.  For the glitter gradient on my middle finger I used Princess from the Royal Glitter collection, also from Barry M.  It just compliments the two pinks perfectly.  I then used my MoYou Pro Plate 09 to stamp on my thumb nail and ring finger.  I stamped in the opposite colour to the base and I think it worked out really well.  Overall I am really please with how these nails turned out and I think they are simple but effective.

Thanks for stopping by
Aimée x

Monday, 25 August 2014

Polish Party: Glitter and Gems - Purple Galaxy Nail Art... and Giveaway

Hi all,

August seems to have flown by, so once again it's Polish Party time.  This month the vote was for glitter and/or gems.  If you follow me or have visited here before you'll know I love a bit of sparkle.

Now, I know I'm late to join in with the galaxy nails craze, but I've recently been enjoying spotting the ISS on it's orbits that have passed over the UK, and also seeing the super moon (although there was no cape in site!).  I was also inspired to give them a go when I saw the pastel galaxy nails that sophiedoesnails posted on Instagram a couple of days ago.

Purple-galaxy-nail-art.jpg

I used quite a few different polishes for this design and it took a while to do because of all the layers, but I am really pleased with how they turned out.
I started with a base of Laka in number 25.  I went to Westfield and they have a express manicure stand on the ground floor with lots of pretty colours to choose from, so thought I needed to try it out.  I used two coats, as the first was a little streaky, but it goes on really smoothly.  The brush is very small in comparison to others that I am used to using, but this does mean that you can paint it on very carefully preventing cuticles from being flooded with polish.  It's a beautiful deep purple with a shimmer finish.  The photo shows all the purples a little more blue than in person, but it's so tricky to get purples right.

After that I used NYC Lights-Camera-Glitter for my first layer of stars.  To create the milky way glow in the middle of my nails I used a make up sponge to carefully add layers of Models Own Snow White, Sinful Colours Fig, and Laka 25 until I was happy with the shape and colour.  To top this off and make it extra sparkly I added a few coats of Jessica Starlet, just to the milky way area on each nail.  The main stars in the foreground were added using my Barry M nail art pen in white.

Just to show you the true sparkle and colours I took a quick picture on my phone outside and a quick video so you get the full effect...

Purple-galaxy-nail-art-2.jpg


I hope you like my purple galaxy for this months theme.  Make sure you take a look at what the others girls do by following the links below.  Don't forget to check out my giveaway at the bottom of this post

Thanks for stopping by
Aimée x


Don't miss the giveaway

Today was a very exciting day... I hit 600 followers on Twitter.  So in light of that I thought I would be fun to host a giveaway!!

Pinkglows 600 Follower Giveaway Prizes

To enter all you will need to do is
  • Follow me on Twitter
  • Retweet the giveaway tweet that will be pinned to the top of my profile
  • Use the hashtag #pinkglows600
The winner will receive the following
  • 1x Models Own - Gumballs (See it here)
  • 1x Barry M Matte- Rhossili
  • 1x Essence - It's Raining Men (See it used here and here)
  • 1x Essence - Party Never Ends
  • 1x Barry M - Nail Art Pen in Black
  • 1x Models Own Artstix Nail Beads in Gold Fizz
  • 1x Nail Embellishment Wheel
  • 1x Pack of Nail Polish Remover Pads
  • 1x Pink Gem Glass Nail File
  • 1x Pack of 20 Manicure Sticks
The giveaway will be open to UK residents only due to posting.  Giveaway closes on 04 September 2014 at 7pm (GMT).

Good luck x

Monday, 18 August 2014

Graffiti Nails: Jet, Tuscany, and Pistachio with flower nail art

Hi all,

I've got a really quick post today, but I wanted to share a cute manicure that I did for a party over the weekend.  A while ago I got these three colours from Graffiti Nails, and have used Pistachio and Tuscany already and they have both been gorgeous on.  I thought it was about time that I used Jet as well.

Graffiti-nails-flower-nail-art.jpg

Jet is such a stunning black, it goes on beautifully and in one coat.  I am so impressed because every other black I've tried has been streaky on the first coat.  I still can't quite believe that's all I needed.

After a coat of Jet I added on these simple daisy style flowers.  I added a dot of Tuscany on each nail and then some petals in Pistachio around each dot.  Sometimes something simple is all you need and I love how these colours all work together so nicely.

Thanks for stopping by
Aimée x

Monday, 11 August 2014

Triplet Nails: Water Spotted Nail Art

Hello all,

As you may remember, back in June I did triplet nails with Lauren from The Naily Mail and Madison from Fundamentally Flawless.  We decided that because we enjoyed the challenge so much that we would choose another nail art technique to have a go at.  This time round we have gone for water spotted nails.

Water-spotted-nail-art-with-bottle.jpg


I had all sorts of plans for these nails, and was going to try and be fancy by marbling three colours together then water spotting them, but I had issues with my colours spreading and being able to work quickly enough, so I went for something a little more simple in the end with white and blue. See my top tip at the end of the post for saving time on clean up if you fancy trying these nails yourself.

Monday, 4 August 2014

Manicure Swap with The Imperfect 10: Pink Butterfly Wings Nail Artwith Tutorial

Hello all,

I had such fun recreating my own design last week for the monthly Polish Party theme, that when Rachel from The Imperfect 10 asked if I'd like to do either twin nails with her, or a manicure swap I went for it.

After a bit of discussion we decided to go for a swap, so I picked a design from her blog and she picked one from mine.  Then all that was left was to paint.

So here is my take on Rachel's pink butterfly wings

Barry-m-butterfly-wing-nail-art.jpg

Barry-m-butterfly-wing-nail-art-2.jpg

I hadn't ever done butterfly wing nails before, so this was the perfect opportunity.  I have seen them about quite a bit on Pinterest and in the blogging world, so they seem to be a bit of a nail art staple, so really, it was about time!

I really liked that Rachel hadn't done the wings on all nails as I think the black details could quite easily overpower the nails otherwise.  Here are the designs side by side

Butterfly-wing-nail-art-swap.jpg
My recreation on the left, Rachel's original on the right
As you can see Rachel went for a bright pink from Models Own, but I didn't have the same colour, so I chose to go for a pink gradient with two Barry M colours - Strawberry Ice Cream and Pink Flamingo.  I built up the colours in quite a few layers as I wasn't getting the coverage I wanted at first.  This meant that clean up was a nightmare though as the polish had dried on to my fingers in between.  Five cotton buds and a little nail brush later I was ready to add the details.

I used my black and white Barry M Nail Art Pens for the details as they are just so easy to work with.  For the non wing nails I added single dots of black and white down the edges as my double dots with black and white looked too messy.  Then it was on to the wings themselves.  I have put together this mini tutorial on how to create butterfly wings in 5 easy steps.  I hope you find it easy to work from - sorry it's shown on a nail wheel rather than my own nails.


Butterfly-wing-nail-art-tutorial.jpg


1. Start with a curved line near the cuticles
2. Then add thee long lines down the nail towards the tip
3. Add tiny curved lines in between the long lines you just created
4. Fill in the tip of the nail with black
5. Once dry add tiny white dots to finish off the look

Don't forget to take a look at Rachel's recreation of my design as well, she went for my pastel rainbow ombré manicure.


Pastel-rainbow-nail-art-swap.jpg
Rachel's recreation on the left and my original on the right
How do you think we both did?

Thanks for stopping by
Aimée x

Monday, 28 July 2014

Polish Party: Recreate Your First Nail Design - Red and Black Hearts

Hello all,

The end of the month brings around a Polish Party design.  July's theme is a good one - Recreate your first nail design.  I have been painting my nails since I was quite young and I remember painting my nails alternatively with lilac and a dark purple and I'm sure I must have painted the odd stripe or dot here or there, but I reckon we'll just go for the first one blogged about!  This works out as an especially good theme for me as my blog turned two at the beginning of the month, so it was nice to look back and see how I launched Pinkglow's Pretty Polish.

Red and black Valentine's hearts

Black-and-red-heart-nail-art-recreated.jpg

I almost don't want to show you the original as it would be something I wouldn't dream of including on my blog now, but it does show progression...

Sunday, 27 July 2014

Models Own: Sweet Shop Collection Review

Hello all,

I am really excited about what I have to show you in this post... Who doesn't love gorgeous new polishes? And if that's not enough these ones are even more yummy as they smell just like sweets.  What could be better?

Models-own-sweet-shop.jpg

From left to right I have Fizzy Cola Bottles, Pear Drops, Rhubarb and Custard, and Gumball.  Also available is Liquorice Allsorts, but that's not one for me.  Keep reading for a closer look and to see what I think of the Sweet Shop collection.

Monday, 21 July 2014

Essence: Let's Get Lost and Magnetic Top Coat Review

Hello all,

I'm sure you will all know by now, but Essence has come to the UK!  They have stands in local Wilko shops and also a shop in Westfield.  If you follow me on Instagram you will have seen that I live near by the shop at Westfield and have already managed to visit there a few times.


Essence-haul-montage.jpg

I've already used Party Princess, It's Raining Men, and Roller Coaster (all from the top right picture).  It's Raining Men and Roller Coaster were featured in my Las Vegas nail art.

Today I have Let's Get Lost and I have tried it out Essence's Magnetic top coat.  I have tried out magnetic nail polishes before so was very interested in how a magnetic top coat would work as it has huge potential to mix up your whole polish collection.

Essence-magnetic-top-coat.jpg

The magnetic top coat comes in a standard nail polish bottle and you can get different magnets to create different patterns.  I chose Sweet Heart and Funky Check.  I decided to test our the heart one first.

Essence-magnetic-top-coat-2.jpg

Looking at the top coat it seems a bit scary at first because it's silver, but that's just the magnetic particles.  The idea is to paint your base colour and leave it to dry fully.  Then you paint on a 'generous layer' of the magnetic top coat.  Before it dries you then hold the magnet above your nail and the particles move into the shape of the pattern.  So here was my first attempt.

Essence-let's-get-lost.jpg

You can just about see the little heart shapes here.  They are not very easy to photograph, but I promise they are more obvious than this in person.  I do however think I need to practise a bit more with this magnet.  This one seems a bit more tricky than others I have used before because it's a single shape on the magnet rather than a pattern that covers the whole nail.  I don't think I held the magnet over my index finger for long enough as the edges of the heart are a little faint and on my ring finger I think I must have moved the magnet slightly as I have a bit of a double edge.  I don't have a clue what happened to my little finger... It doesn't seem to be a heart at all! Ooops!  The other thing I found with this being a single image is that you can still see some of the magnetic particles around the edges of the nail.  To see if it made a difference, I used a false nail to paint just a patch of the top coat, rather than the whole nail, but I only got half of the heart shape.  You'd have to be really certain where the shape was in the magnet to make sure you got the particles in the right spot.  Over all I am still very impressed with this concept and I am looking forward to trying the Funky Check design as it's a whole nail pattern.  Have you tried this Sweet Heart magnet and have any tips?

The colour, as I mentioned before is Let's Get Lost.  I love this colour.  It's such a pretty turquoise blue.  It paints on beautifully and has a nice rounded edge brush which makes it very easy to apply.  It was a bit patchy with just one coat, but with two it's perfect.  I also love Essence's bottles.  The lids match the polish, making them easy to find in your stash and the rounded end makes them comfortable to hold whilst painting.

In my haul pictures at the top of the post you can see that I have also tried out the Quick and Easy Sponge Nail Polish Remover.  It worked really well to take off glitter polish (the one in the picture is Party Princess).  My litter finger and ring finger show three coats and my middle finger shows it in progress of removal.  You might be able to see on my index finger that my nail is peeling/flaking at the end.  I get this quite a lot, so I got the Express Nail Peeling Pen.  It has a little rubber massage applicator at the end which helps to massage the product into the nails and cuticles.  This seemed to really help even on the first use, so I will keep you updated.  I also got, and have tried, the Express Nail Oil Pen.  I have been using a Nails Inc nail oil pen which I really liked, but it ran out and is rather expensive to repurchase, so I thought I'd give the Essence one a go.  The brush tip is lovely and soft and the oil smells fresh and... well, I don't know how to describe it, but it's nice!

So far I am loving all the Essence things I have tried, so I wouldn't think it will be long before I need (yes need!) some more.  I haven't tried it yet, but I'm really excited about the Glow In the Dark topcoat that I got as well.  It's really bright in the bottle.  My first little haul of three colours was only about £4.99 and then my second haul of 11 items (which also included a mascara) came in at under £24! As far as I'm concerned, you can't go wrong.  Which items do you think you'll be trying out?

Thanks for stopping by
Aimée x

Monday, 14 July 2014

MoYou Nails Stamping Plates Review*

Hello all,

I have recently had quite a few goes at stamping and have found it really fun so I was pleased to be asked to review MoYou Nails stamping plates.  I chose plates numbers 102 and 220, and pink polish to review.


MoYou-Nails-Stamping-2.jpg

*Press sample - sent to me for review

I was sent a catalogue of all the latest products, a bottle of special polish in pink, the two plates, and a stamper and scraper, which is obviously very handy.  Both plates have floral designs, 102 have small single designs and 220 has larger designs meant to cover the whole nail.

MoYou-Nails-Stamping-3.jpg

It's quite tricky to get a picture of the plates, but this one I uploaded to Instagram shows them quite well.  On first impressions the plates seem rather thin and therefore not very sturdy when picking up the images.  I think they could do with a thicker backing.  The stamper and scraper are pretty standard in comparison to others that I have come across.  I had trouble with another stamper before which was very shiny on the surface so I had to buff it before it would pick up an image.  This one wasn't shiny, so I thought that it would be better however I still had to buff it quite a lot before I was able to use it properly.  

To get going with the manicure I started off with a coat of pink polish on all my nails apart from my ring finger.  For this one I chose to use Essence in It's Raining Men.  I wanted a darker colour to test how the stamping polish would work over a darker colour.  I then stamped with the opposite colour to the base.

MoYou-Nails-Stamping-1.jpg

I found that the polish dried really quickly and it needed two coats to get full opacity.  Whilst the speed of drying time was good for stamping on to, it wasn't brilliant when trying to stamp with it.  You have to work pretty quickly when stamping anyway, but with a quick drying polish it did make it more difficult.  As you can see I have stamped a selection of different designs from the plate which are very pretty.  On my ring finger I stamped a full nail design with the pink polish.  It worked quite well, but doesn't show up as much as I would have liked.  I think in that respect it's a little disappointing for a stamping polish.

Overall these are not my favourite plates, but there is a nice selection of different designs.  Do you have any tips for stamping to get the best out of them?

Thanks for stopping by
Aimée x

Monday, 7 July 2014

Welcome to Fabulous Las Vegas Nail Art

Hello all,

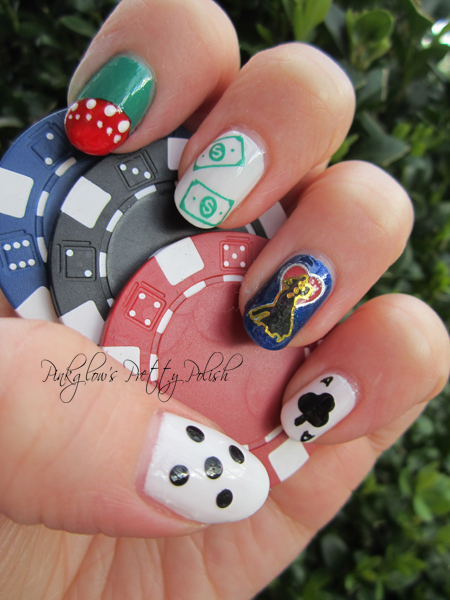
Last week I was contacted by Vegas.com, who are looking for inspiration for the perfect night out on the town.  The featured hotel this month is the Aria Resort which looks amazing and what better way to plan a manicure for a night out in Vegas than thinking about all the things that it's famous for and what's more famous than the casinos and the strip?

Vegas-nail-art.jpg

I decided to paint each nail differently but still following the theme.  On my thumb I have gone for a dice.  I used Models Own Snow White for the base (this is also the base for my middle and little finger) and then my Barry M Nail Art Pen in Black for the dots.  My index finger features a bright red poker chip.  I used Essence Roller Coaster for the base to look like the green felt of the table.  Once that was dry I painted on a white semi circle on the tip of my nail, this was so that when I painted on Barry M Bright Red the colour would really pop.  I then used my White Nail Art Pen to add in the detail.  My middle finger is stamped with a dollar stamp from my MoYou London Tourist Plate 02 (shhhh, it's actually the New York themed one, but no one has to know!).  When thinking about Vegas, I thought of the wedding chapels.  I used a base of Essence It's Raining Men, which has a beautiful shimmer, I then added a nail art sticker of a silhouetted couple with a heart, to represent a couple getting married under the stars.  My little finger nail is the ace of clubs.  I did the details with my black nail art pen.

I think my nails are all set for a night out in Vegas... What do you think?

Aria Resort Vegas - Photo from Vegas.com

Now all that's left is to actually go! One day....

Thanks for stopping by
Aimée

Monday, 30 June 2014

Ciaté Mini Caviar Nails

Hi all,

You may have seen that with the July edition of Marie Claire there are free mini caviar nail kits from Ciaté.  Marie Claire is £2.50 and the kits are valued at around £10, so you can't really go wrong.  If you follow me on Instagram you will have seen that I have two sets.  The first kit was given to my mum and she gave it to me.

Ciate-mini-caviar-sets.jpg

The blue is Starry Night and is made up of Ferris Wheel polish and Frost Yourself caviar pearls.  The purple is Fairy Dust and is made up of Sugar Plum polish and Ice Queen caviar pearls.  I haven't ever done caviar nails so I thought these would be the perfect way to try the technique out.  These are also my first Ciaté polishes.  I decided to use the Fairy Dust set first.

Ciate-mini-caviar-nails-fairy-dust.jpg

Sugar Plum is such a pretty lilac shade and I am really impressed with it.  It was extremely streaky on first coat so I was a little worried, but when I applied a second coat it evened out.  Looking at it now I think a third coat would have been even better but it's ok.  This has to be the glossiest pastel colour I have used.  I didn't really need to apply a top coat to add any shine.  It's very different to have a finish like this with a pastel shade.  The Ice Queen pearls are a mix of different colours in silver, purple, clear and iridescent blue. I think the idea to apply the pearls is to pour them over the wet polish.  I thought this would get fiddly and very messy so I poured them into a bowl and dipped my nail directly into the pearls.  All I had to to then was gently press them into the wet polish to secure them.  Over all I am very pleased with my first Ciaté caviar nails and I am looking forward to seeing how long the pearls last.  Day one, so far so good, a few have made a bid for freedom, but there aren't any glaring gaps.

Will you be trying out any of the mini caviar kits?

Thanks for stopping by
Aimée x

Related Posts Plugin for WordPress, Blogger...