Hello all,
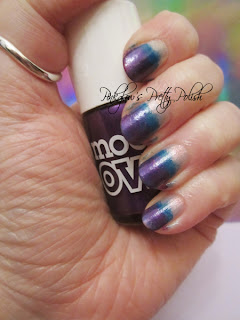
With the weather becoming colder over the last few days and with snow hitting the UK today, my nails for the week have been inspired by the winter. One of the things that I look forward to watching on the television in the winter is 'Dancing on Ice' and the colours that I chose for my design are based on the logo for the show.
I have included a step-by-step for the design, in case you'd like to have a go yourself - enjoy!
This is what I have used for my design, but you can create the look with any complimentary colours that you'd like. I use Models Own polishes for my design.
Top row:
- True Blue
- Pink Fever
- Indian Ocean
- Blue Med
- Purple Imperial
- Freak Out
To start, use a base coat as normal and start with your lightest colour as an overall base. For me this was Indian Ocean. I only used one coat for my base.
 |
| Step One |
This is a really eye catching colour as it has a blue or pink shimmer depending on the light. Once this coat has dried the next step is to drip a small amount of your next colour onto a scrap of paper. Taking your make up sponge dip the corner of the sponge in the polish and then dab on your nails. You will need to dab this second colour quite far up the nail in order to complete the ombré effect over the whole nail. My second colour is Blue Med.
 |
| Step Two |
The picture doesn't show the Blue Med up very well as it's over the top of my other colour, but it all adds to the ombré effect and the colour gets gradually darker as you go down.
For the third step you need to drip some of your next colour on your scrap paper, in my case this is True Blue, and again using your make up sponge you dab this over your nails a little bit further down from your second colour, down to the tip of the nail.
 |
| Step Three |
As you can see True Blue is a much darker shade than the others applied so far and this can start to get a bit messy around the edges of the nails. Not to worry though, this can all be cleaned up at the end. For the next step of the ombré colours I moved on to Pink Fever. Again dripping some of this onto a scrap of paper and using the make up sponge to dab the colour on the nails. I used the same make up sponge throughout my whole design, but for the purple and pink in my design I switched to a different corner of the sponge.
 |
| Step Four |

Nearly there with the sponging of colours. You can see because I have sponged pink over the blue it appears more purple. To finish off I wanted the purple at the tips of my nails to be darker so I repeated the same steps as before using Purple Imperial.
 |
| Step Five |
 |
| Step Six |
After sponging on your final colour take your normal top coat and paint a thin layer over all the nails. This blends the colours together and smooths out the layers as you can see in step 6.
You can then leave it like this if you would like, but I always find that to really finish off the whole effect it's best to add glitter, and lets face it, pretty much everything is better with glitter! I chose to top my ombré nails off with Freak Out from the Models Own Mirrorball Collection.
And voila! You have beautiful glittery ombré nails!


Thanks for the brilliant tutorial; more of these please!
ReplyDeleteGlad you found it useful! Keep checking back for others
ReplyDeleteThanks for this tutorial, very pretty and looks quite simple to do! Great blog, luv your nail posts. Am trying to move on from just plain solid colours in my nails so these are good inspiration x
ReplyDeleteGlad you found the tutorial useful Jenni Jen. It is simple to do, although it can get a little messy around the edges, but it's all eaisly cleaned up!
DeleteThanks for your lovely comments and for following x
I'm not allowed nail varnish at work but I've got 10days off next week, and I'm going out with friends to celebrate my birthday. I will definitely be giving this a go. I'll send you a photo and let you see how I got on!!
ReplyDeleteE x
I would love to see how you get on with this design! It's bright, fun and funky - enjoy!
DeleteHave a great birthday and have a brilliant time celebrating x