Showing posts with label Red. Show all posts

Monday, 22 June 2015

Choose Happiness Coca Cola Inspired Nail Art

If you're anything like me you will spot nails from a mile off, whether that's because they are nicely painted, sporting a bit of nail art, or the more upsetting flipside of this, all chipped and sad looking.

Well, I was watching TV the other day and the adverts came on, so it was a perfect opportunity to scroll through my social media feeds, but I happened to spot nail art in one of the new Coca Cola adverts.  It's only on screen for a fleeting second or so, but never the less there it is, so I decided to recreate it.

coca-cola-choose-happiness-nail-art.jpg


To make this nail art even more fitting I used OPI Coca Cola Red - how could I not?  My thumb, middle, and little fingers are Coca Coal Red with black spots and my index and ring fingers are the opposite.  I used Graffiti Nails Jet which is one of the best black polishes I've used.  I tend to find that some blacks are a bit patchy, especially on the first coat, but Jet is so opaque, and glides on really smoothly.

coca-cola-choose-happiness-nail-art-2.jpg

Where do you get your inspiration from?

Thanks for stopping by
Aimee x

PS I've embedded the video below so you can see the original.  It's part of Coca Cola's #choosehappiness campaign.


Monday, 10 November 2014

Remembrance Day Poppy Nail Art

Hello all,

This year, as you know, marks the centenary of the First World War, so it seemed only right that I should show my support for the armed forces by having poppies on my nails.

Poppy-nail-art-2.jpg

At the weekend I got three of the new Models Own HyperGel colours and I couldn't wait to try one of them out.  I chose to use Ebony Green along with Red Lustre, one of the original HyperGel colours, and Snow White, to create my Remembrance Day nails.

I started off with a base of the green on just my middle nails, the red on my index finger and little finger, and white on my thumb and ring finger.  All nails have two coats and a top coat.  Once this had all dried a used a thin striper brush to create the poppy stalks on my white base.  I dropped some polish onto a scrap of paper, and so that I didn't overload the brush with polish I pulled it gently across the polish picking up a small amount of colour at a time.  I then carefully dragged the brush down my nail, from cuticle to tip to create the stalks.  I added a few thicker lines, and used a dotting tool to create buds.  I then used my dotting tool again to create tiny red flowers amongst the stalks.


Poppy-nail-art.jpg

I wanted to create the look of poppies in a field, rather than the traditional poppy you might buy and pin to your coat.  Overall I am not sure how I feel about the finished look.  It's not quite how I imagined it when I was planning, but I don't think it's because of the poppies, I think it might be because the colours look very Christmassy.  What do you think?

Thanks for stopping by
Aimée x

Monday, 15 September 2014

Cherry Nail Art

Hi all,

I wasn't sure what to do on my nails this week and I was lacking inspiration overall, but I just didn't want to go for a plain colour.  I had seen someone (I'm really sorry I can't remember who) post some cute cherry nails a while ago somewhere on social media so thought I'd give them a go myself as they'd be cute and quite quick.

Cherry-nail-art.jpg

I was away for the weekend so didn't have all my nail bits with with so borrowed this OPI Big Apple Red for my main colour.  I don't normally go for red nails as I'm not sure they're really 'me', but this colour works really well for my design.  

Originally, I used Orly White Out and China Glaze Emerald Sparkle for my base for my cherries and the stalks, but my top coat made a big smudgy mess!  I wasn't happy so I took the the polish off those two nails are started again when I got home.  I ended up using Models Own Snow White and Barry M Spring Green.

Overall I'm not sure how I feel about this design.  Perhaps it's because I wasn't overly inspired this week, so the idea didn't transfer from thought to nail quite as imagined? What do you think?

Thanks for stopping by
Aimée x

Monday, 28 July 2014

Polish Party: Recreate Your First Nail Design - Red and Black Hearts

Hello all,

The end of the month brings around a Polish Party design.  July's theme is a good one - Recreate your first nail design.  I have been painting my nails since I was quite young and I remember painting my nails alternatively with lilac and a dark purple and I'm sure I must have painted the odd stripe or dot here or there, but I reckon we'll just go for the first one blogged about!  This works out as an especially good theme for me as my blog turned two at the beginning of the month, so it was nice to look back and see how I launched Pinkglow's Pretty Polish.

Red and black Valentine's hearts

Black-and-red-heart-nail-art-recreated.jpg

I almost don't want to show you the original as it would be something I wouldn't dream of including on my blog now, but it does show progression...

Sunday, 27 July 2014

Models Own: Sweet Shop Collection Review

Hello all,

I am really excited about what I have to show you in this post... Who doesn't love gorgeous new polishes? And if that's not enough these ones are even more yummy as they smell just like sweets.  What could be better?

Models-own-sweet-shop.jpg

From left to right I have Fizzy Cola Bottles, Pear Drops, Rhubarb and Custard, and Gumball.  Also available is Liquorice Allsorts, but that's not one for me.  Keep reading for a closer look and to see what I think of the Sweet Shop collection.

Monday, 7 July 2014

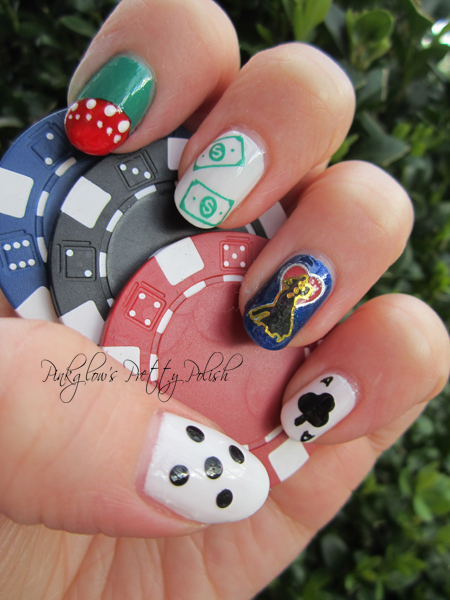
Welcome to Fabulous Las Vegas Nail Art

Hello all,

Last week I was contacted by Vegas.com, who are looking for inspiration for the perfect night out on the town.  The featured hotel this month is the Aria Resort which looks amazing and what better way to plan a manicure for a night out in Vegas than thinking about all the things that it's famous for and what's more famous than the casinos and the strip?

Vegas-nail-art.jpg

I decided to paint each nail differently but still following the theme.  On my thumb I have gone for a dice.  I used Models Own Snow White for the base (this is also the base for my middle and little finger) and then my Barry M Nail Art Pen in Black for the dots.  My index finger features a bright red poker chip.  I used Essence Roller Coaster for the base to look like the green felt of the table.  Once that was dry I painted on a white semi circle on the tip of my nail, this was so that when I painted on Barry M Bright Red the colour would really pop.  I then used my White Nail Art Pen to add in the detail.  My middle finger is stamped with a dollar stamp from my MoYou London Tourist Plate 02 (shhhh, it's actually the New York themed one, but no one has to know!).  When thinking about Vegas, I thought of the wedding chapels.  I used a base of Essence It's Raining Men, which has a beautiful shimmer, I then added a nail art sticker of a silhouetted couple with a heart, to represent a couple getting married under the stars.  My little finger nail is the ace of clubs.  I did the details with my black nail art pen.

I think my nails are all set for a night out in Vegas... What do you think?

Aria Resort Vegas - Photo from Vegas.com

Now all that's left is to actually go! One day....

Thanks for stopping by
Aimée

Monday, 2 June 2014

MoYou Stamping with Pro 09 Plate

Hello all,

A while ago now I ordered four stamping plates from MoYou as I kept seeing lovely designs that other people had done using them, so I thought I would give them a go.  I went for the Kitty 07, The Pro 09, Tourist 02, and Scholar 05, along with the pink stamper and scraper set.  It's just the perfect colour for me!

MoYou-Stamping-platesjpg

I was really excited to try these and had my first design all planned with my Tourist plate.  I got all my polishes ready, tissue to wipe the scraper and clean the plate in between, and anything else I might have needed, but could I get it to stamp?

Monday, 5 May 2014

Jacava: Too Hot To, Red Velvet, and Cherry Brandy*

Hi all,

I have some gorgeous colours from Jacava London to show you today.  These are some of their latests releases and are definitely brilliant additions to the Jacava family.

Jacava-new-collection-2014.jpg


* Press sample - sent to me for review

Monday, 3 February 2014

Models Own: HyperGel Review* - Vintage Roses

Hello all,

I was very excited to get three Models Own HyperGels in the post to try out.  I was even more excited that the three that I got were my favourites of the 10 colours available! I got Cerise Shine, Blue Glint and Red Lustre.  My original plan was to swatch them all, but I was having nail art withdrawals so decided for something in between.

* Press sample - sent to me for review

Models-own-hypergel-roses-nail-art.jpg

The HyperGel polish is amazing! Normally I use at least two coats of polish, but I have only used one here.  The coverage is so even and opaque you just don't need anything more.  And look how gorgeously shiny it is.  I was very pleased with the drying time, I was expecting it to take quite a while as it's gel effect, but it was dry surprisingly quickly ready for my nail art.

As you can see I have used Cerise Shine on three fingers and Blue Glint as a background for my accent nails on my finger finger and thumb.  Simply using the normal polish brush I dabbed on three Cerise Shine splodges and waited for those to dry.  To add petals to my roses I used Red Lustre for shade (you can just about see it in the picture).  I also needed a highlight so I chose to use Strawberry Tart from the Fruit Pastels collection.  To create the petals I used a really small nail art brush and painted on two 'c' shapes in slightly different sizes and ant different angles.  I started off with the shade and then went in again in the same way with the highlight.  Then to finish my roses off all they needed were some little leaves.  I used Apple Tart, again from the Fruit Pastel collection.  So not only do my nails shine like I have had gels, but they smell yummy too!

I am really pleased with this design.  I think it's simple enough that you can still see the beauty of the HyperGel polishes but it's also really pretty and girly.

I am loving seeing what everyone has bought in the Models Own sale recently over on Twitter! Glad to see I am not the only polish addict around - leave me your links so I can see what you got!

Monday, 23 December 2013

Christmas Tree Dotticure Nail Art

Hello all,

I have my last Christmas nail art of the season and more importantly it will be what I have on my nails on the big day!

Christmas-tree-dotticure-nail-art.jpg

This was a 'pinspired' design this week.  This year I have seen lots of Christmas trees done with striping tape, so I was looking for something different and came across this pin.  I loved it so much that I just had to have a go.  Clicking through and reading the blog post about this I found out that it was inspired by another blogger as well, so it's really going around now!

I started off with two coats of Snow White from Models Own.  This is a fab white polish.  A bit streaky of first coat, but perfect in two.  I then used Barry M Red Glitter, China Glaze Emerald Sparkle and Models Own Bora Bora to create my dots.  Using different the two different end of my dotting tool for the large and medium dots and then end of a cuticle stick for the tiny dots.  I repeated this pattern on all my nails, but left my ring finger free for my Christmas tree.  For the tree I started by dotting Emerald Sparkle in a single dot in the centre of my nail just below the cuticle.  Then two dots at the tip of my nail to create a triangle pattern.  I then filled in the rest of the tree with some extra green dots.  I then added three Red Glitter dots for baubles and three Bora Bora dots for tinsel.  The star had to be something a bit special so I added a yellow gem to sparkle away at the top of the tree.  Then came the tricky part... Top coating without causing drag on the dots over the white! And look... It worked!!!!!!! Yay!!

I love how festive this manicure is and what was even better was that it was so simple!  I also did some nail art for my mum and sister as well...

A fancy swirly tree for my mum and snowflake for my sister.

Christmas-nail-art.jpg

I hope you all like my Christmas tree dotticure and have a very Merry Christmas x


Monday, 16 December 2013

Christmas Present Nail Art

Hello all,

Continuing the Christmas theme I have cute present nails this week.  And what could possibly make a present better? That's right, glitter!

Christmas-present-nail-art.jpg

I used Models Own Sardonyx from the Velvet Goth collection for my base colour.  You need two coats of this as it's a little streaky first of all.  It dries with a matte finish which means that it dries really quickly which worked out well for me as it meant that when I came to doing the bows my base was nice a dry.  I always make a mess when I used red polishes for some reason and this was no exception, clean up was a little tricky as it's glitter, but it worked out ok in the end.

To create the bows and ribbons for my presents I used the Models Own WAH Nail nail art pen in gold.  This was perfect for it as you have the striper brush when you twist the lid, but then you have the pen if you pull the lid off.  I started with two lines creating an offset cross on each finger and then used the pen end to draw two loops and tassels of the bow.

I topped this off with Sally Hansen Ista-Dri top coat to add a nice shine.  I really love how this turned out and it reminds me of Cartier in New York at Christmas...

Cartier New York 2006
Here's a picture I took whilst I was there in December 2006


Monday, 25 November 2013

Polish Party: Disney - Mickey and Minnie Nail Art

Hello all,

It's the end of the month, and you know what that means? Polish Party time.  Out theme this month is Disney.  I have loved Disney since forever and Mickey and Minnie have to be my favourite so when our theme was picked I knew they were going to feature.  I couldn't decide how to do them first of all, but then settled on hints of both characters.

Then all I had to do was decide how to include them both on one hand... Or did I?

Mickey-and-minnie-mouse-nail-art.jpg

I went for Mickey on my left hand and Minnie of my right hand.  Both have nails that are the same, because these features match on both Mickey and Minnie, so on both little fingers I chose to use yellow to represent their shoes.  Then on both index fingers I have a white base with three simple black lines to represent their gloves.  For Mickey I have on my ring finger and thumb, his iconic red shorts with yellow buttons, and for Minnie I have her red dress with white polka dots.  For my Mickey hand I used a little dotting tool to create mini Mickey's (hee hee!!) over a white base, and then for my Minnie hand how could I not include her bow?

I had so much fun doing these and I love that I have a different character on each.  As I type it looks like Mickey and Minnie dancing across my key board.  They certainly brighten up my day when I look at them.

Don't forget to keep up with what of the rest of the Polish Party girls have done for their Disney themed nails.  Follow the links below to take a look


Monday, 18 November 2013

Gone Wild - Animal Print Nail Art

Hello all,

Well, it seems it's only too easy to change my mind.  Having done a first last week, leaving a manicure matte, there is no stopping me now.  I have only gone and done it again!  After a comment on Twitter on my nails last week I was inspired to create my design this week and I am so so SO pleased with how they turned out.

Barry-m-animal-print-nail-art.jpg

These are my gone wild animal print nails.  Aren't they fun?  These took me quite a long time to do, but only because I wanted them to be just right so I took plenty of time.

From my thumb round to my little finger I have done, zebra, leopard, tiger, giraffe and cheetah prints.  I had the first four in mind all week long before doing these but had to think a bit more to come up with cheetah.  Want to know how I did these?  Well here goes.

Zebra - I started off with two coats of Snow White from Models Own.  After this had dried I used my Barry M nail art pen in black to freehand the stripes.  I bought the nail art pen especially for this as I was quite worried about this print and trying to do it with a striper or brush.  I can tell you now that I am most definitely not a fan of zebra print.  On my other hand I ended up removing it three times before it was only ok.  I do not think I will be doing this print again.  Well not freehand anyway!

Monday, 4 February 2013

Love Bug Ladybird Nail Art for Valentine's Day

Hi all,

I have been inspired by one of my mini Me to You bears for this week's design.  I kept Valentine's Day in mind, but I didn't want to do a design with the traditional hearts.

Love-bug-ladybird-nail-art.jpg


These cute ladybird nails are really simple to do.  Simply paint your nails in a bright red and then when that is dry, use a black striper to create a line down the middle of your nails.  Do this on all nails other than your ring finger.  Here you will need to create a red circle on the tip of your nail and then add the black line to that as with the other fingers.

To add the rest of the details of the ladybird use a small brush or a tooth pick to add a crescent shape over the top of your red circle in black.  This will be the ladybird's head.  Using a black striper add two small lines for antenna, and at the end of these I have drawn very small hearts with a nail art pen.  Models Own nail art pens have both a striper and pen in one tool so are great for a design like this.  The striper gives a very fine line and the tip of the pen is very fine for small details.

To finish off the rest of the design, use a dotting tool dipped in black polish to finish the ladybird effect.  If you wanted, you could make these dots little hearts as well, but I decided just to add simple dots for my design.

I hope you like my love bug ladybird design and maybe try it out this Valentine's Day.

Monday, 7 January 2013

Rimmel: Precious Stones - Ruby Crush

Hello all,

I decided to treat myself to a bottle of Rimmel Precious Stones in Ruby Crush.  It caught my eye sparkling away so I couldn't resist.  You can see it in the cover photograph at the top of my blog.


As you can see it is a gorgeous rich red sparkle polish with larger round particles of silver glitter.  The first coat was a little patchy in places and the polish is quite thick to apply, but after two coats it sparkles away beautifully.  It reminds me of Dorothy's shoes in The Wizard of Oz.  The polish dries very quickly which is a bonus, however it dries with a very grainy finish.  I finished my nails off with two coats of top coat and there is still a grainy feel to my nails and I am worried that this might mean it will chip quite easily.
 
I think this might be better for an occasion rather than an everyday colour, but fingers crossed it proves me wrong and lasts well.  I have nothing bad to say about the colour as it looks as good on my nails as it does in the bottle.

Sunday, 16 December 2012

Candy Cane Inspired Nail Art

I have been working my way through some Christmas designs and have been really pleased with the results so far!

I think this week's are my favourite that I have done though.  I was thinking of Christmas things that could inspire my nail art and I decided that candy canes would look fab.  Rather than go for red and white stripes I wanted to take a different approach.

Candy-cane-watermarbled-nail-art.jpg
 
 
This design was very easy to create, but very messy with watermarbling!  I painted three of my nails in Bright Red by Barry M and added my Collection 2000 sparkle top coat.  I love the top coat because the glitter is so fine but so pretty.
 
I painted my ring finger and thumb with a base of  white polish, I used Sally Hansen.  Leave this to dry and then comes the messy part.  To do water marbling you need a cup of room temperature water and your polishes.  New polishes work best.  You can use as many colours as you like, but you need to work quite quickly.  Drip your first polish on the surface of the water, I let a few drips fall to make sure I had enough.  The polish will start to spread out on the surface of the water.  Then add some drips of your other colour.  Then taking a tooth pick draw some swirls or stripes into the polish on the surface of the water.  When you are ready bend your finger placing the nail directly down onto your swirled polish, then straighten your finger straight down into the water.  You will see that there is polish still on the surface of the water.  Before removing your finger you need to get rid of the polish from the surface otherwise you will ruin your design.  Blow gently on the polish on the polish on the water, then using your tooth pick swirl it around on the surface and the polish will start to stick to the tooth pick.  Once the polish has gone from the surface of the water you can carefully remove your finger from the water.  You will have a lot of polish all around your nail and on your finger, which can look a bit scary, but all it takes is a cotton bud dipped into nail polish remover to take it off.  To help with this you can also use Vaseline around your nail and on your finger to stop the polish sticking so much.
 
Repeat those same steps for each watermarbled nail and voila - you have candy cane inspired nails!  I finished these nails off, once they were dry and cleaned up, with a coat of the sparkle top coat.  What's great about watermarbling is that no two nails look the same so you never really know what you might get.
 
I hope you like them and maybe try out watermarbling yourself.  If you get stuck there are loads of videos on YouTube that will help you out.

Monday, 10 December 2012

Christmas Plaits Nail Art

My nails have got more Christmassy this week with some festive Christmas plaits.  I first saw these plaits (or fish tail) nails a while ago now and tired them when I first saw them as the effect was something quite different from things that I had seen before.  But now getting round to Christmas designs I thought I would give them another go in festive colours.

Christmas-plaits-nail-art.jpg


I decided that I wanted to create the plait design on my thumb nail and ring finger,so I painted the other three fingers with silver from Models Own.  I had already picked white, red and green to be the colours for the plaited nails.  To start off the plaits I painted the nails on each hand with white and left this to dry.  Taking my next colour I then painted a diagonal stripe.  I again left this to dry.  Taking my third colour I made a diagonal stripe in the other direction.  Leaving each stripe to dry in between I then just continued down my nail alternating my three different colours until I reached the tip of my nail.

This can take a while, but I think the effect is worth it in the end.

I hope you like this festive design and maybe have a go yourself!

Monday, 12 November 2012

Remembrance Day Nail Art

To remember all those who fought for us I decided to do Remembrance Day nails.

This was a very simple design, but I think it looks great and is a lovely way to show support.

I painted my thumb and ring finger with a pearly white then the rest of my nails with red.  Then using a glittery red polish I created a poppy on my thumb and ring finger.  I did these by taking my dotting tool and adding four small dots close together and then pulling the polish into the centre to meet in the middle.  To finish off the poppy all you have to do is add a little black dot in the centre and a little green leaf.

To finish off the whole design I added a diagonal stripe of glittery red polish to all my red nails.

I used Barry M and E.L.F nail polishes for this design.


Remembrance-day-nail-art.jpg
 
 
Why not show your support and try out this design?

Sunday, 2 September 2012

Back to School Nail Art with Tutorial

It's that time of year again, it's time to go back to school.  When we think of this time of year there is an iconic symbol that always springs to mind... the apple.

The apple has inspired my new design.  I hope you like it and give it a go yourself by following my step by step guide.

Back_to_school_nail_art


What you will need:
  • Base coat
  • White polish
  • Nude polish
  • Red polish
  • Red glitter polish
  • Brown polish
  • Green polish
  • Top coat
  • Cotton buds
  • Nail dotting tool/thin paint brush
Back_to_school_nail_art
These are the polishes I used to create the look.
 
 
First, use a base coat to protect your natural nails and start the design by painting your nails with a simple French manicure.  Paint the tips white and leave them to dry and add a coat of a nude colour.
 
 
Back_to_school_nail_art
 
 
Leave this to dry before moving on to the next step.  To create the body of the apple I used red, but you could always choose green if you wanted.  I also decided to make one of my apples sparkle for that extra special look, but you don't have to do this if you don't want to.


Take your red polish and drip some onto a scrap of paper.  Using your cotton bud dip this into the polish and then add a red dot to your nail, slightly overlapping your French tip.  Continue this on all your nails.  I added the red glitter polish to my ring finger in the same way.
 
Back_to_school_nail_art


Again leave this to dry before moving on to the next step.  To create the stalk of the apple you will need to use the nail dotting tool or thin paint brush.  I have a double ended nail tool with both of these, so to create the stalk I used the brush.  As with the body of the apple drip some of your brown polish onto a scrap of paper.  Using your brush paint a small brown line moving away from the apple.
 
 
Back_to_school_nail_art


For the leaf I used the nail dotting tool, but you can use the brush if you want, just clean it using a small amount of polish remover on some cotton wool.

Drip a small about of your green polish onto your scrap of paper and using the dotting tool create a small dot by the brown line you just painted for the stalk.  Drag the dot in the opposite direction to create the leaves.  Do this on all your nails.

Back_to_school_nail_art


To finish, eave this to dry then add a thick layer of a top coat to protect your new design.  You now have a back to school manicure.

Enjoy.


Tuesday, 31 July 2012

Olympic Rings Inspired Manicure

Living in London I have to admit that I was less than enthusiastic about the Olympic Games because I just thought it was going to be so disruptive to everyday living, however, now that it is here and I have watched it (on the TV) I have been enjoying what I have seen.  On that note I decided to do an Olympic Rings inspired manicure.

It is a very simple yet effective design, so I haven't done a step by step guide, however I will talk through what I have done to get this look.

These are the polishes that I used for my design.

Olympic coloured nail polish


There are the colours for the Olympic Rings in blue (L.A. Colors, Color Craze in Wired), yellow (Barry M in Yellow), black (Revlon in Blackest Black), green (Barry M in Spring Green) and red (Barry M in Bright Red).  For the base of this design I used a Rimmel London French Manicure in French Rose and Collection 2000 Sparkle Top Coat.

Olympic Ring Inspired Nail Art


I always start off with a base coat to protect my nails.  As a base I used my French manicure colour which is a really subtle, but pretty pink, after this had dried I then painted a coat of sparkle top coat to add the extra shine (to hopefully match that of medals!).  Then taking each of the colours of the Olympic rings I painted the tip of my nail, just as you would for a French manicure with each of the colours in the order of the rings.  I finished off with a clear top coat to protect the design.

I hope you agree that this is simple but effective.  Enjoy it if you have a go yourself.
Related Posts Plugin for WordPress, Blogger...