Monday 30 November 2015

November - Odds and Ends

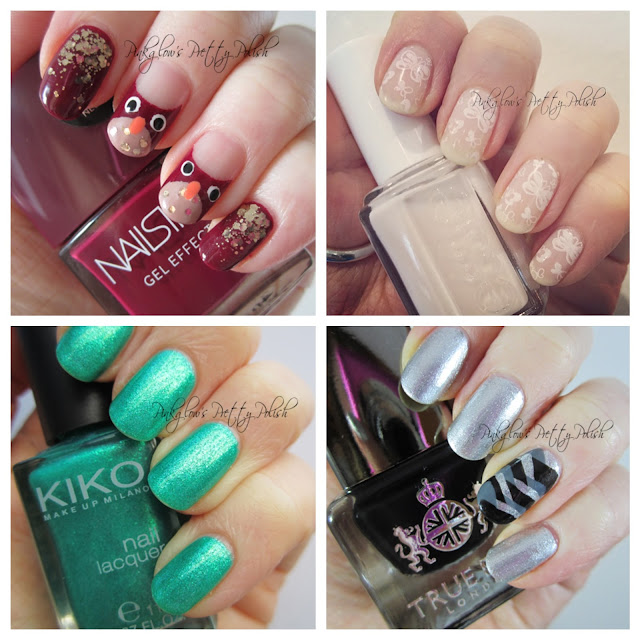
I have had a bit of a mix and match month this month, with some darker nails, some lighter ones, and a bit of fun nail art.

November-monthy-mani-favourites.jpg

I was inspired by the colours in my October Nailbox box, and for my first design this month I did some cute owl nails.

Autumn-owl-nail-art.jpg

I started off bt masking my nails with round stickers on my middle finger and ring finger.  I then painted a base colour of NailsInc Kensington High Street on all fingers.  I had to peel the stickers off carefully to create the ears of the owls.  I decided to add a reverse glitter gradient on the 'non owl' nails with Essie Summit of Style.  This is just such a pretty antique gold glitter that really sparkles.

For the details on my owl nails I used Rimmel Caramel Cupcake for the tummy feathers, with individually placed glitter particles from Summit of Style.  Then I dotted on white and black for their eyes and orange for a beak.

Lacey-butterfly-nail-art.jpg

With a little less time to come up with a nail design I tend to fall back on to nail stamping because it's quick and easy and looks really effective.  I went for a lacy butterfly effect with this design using Essie Ballet Slippers as a neutral base, and white stamping over the stop using MoYou London White Knight and the number 10 Princess Plate.  I really liked the overall look, but wish that I had been able to vary the stamped image.

Kiko-531.jpg

I was recently having a look around in Kiko, and I was taken with three sparkly shades.  I was going leave them and put them on my Christmas, but my fiancé wouldn't let me leave and bought them for me.  This is 531.  How pretty is this?  I am a little disappointed that it doesn't have a fun name to match the beautiful sparkle.

Black-grey-and-silver-plaited-nails.jpg

To finish off the month I decided to go with a metallic and black plaited nail design.  I only added the plaited effect on my ring finger and thumb because it can take quite a bit of time to get the finished look depending on how long your nails are.  I used True Brit London Taxi Cab, Barry M Grey, and OPI Turn on the Haute Light for this look.

So, as you can see, a bit of a mixed bag overall.  I think the owls were my favourites this month.  What;s yours?  Leave me a comment and let me know.   I can't believe December is already knocking at our door, but that does of course mean it's time for Christmas nails - yay!

Thanks for stopping by
Aimée x


Sunday 1 November 2015

October - Autumn Fun and Glitz

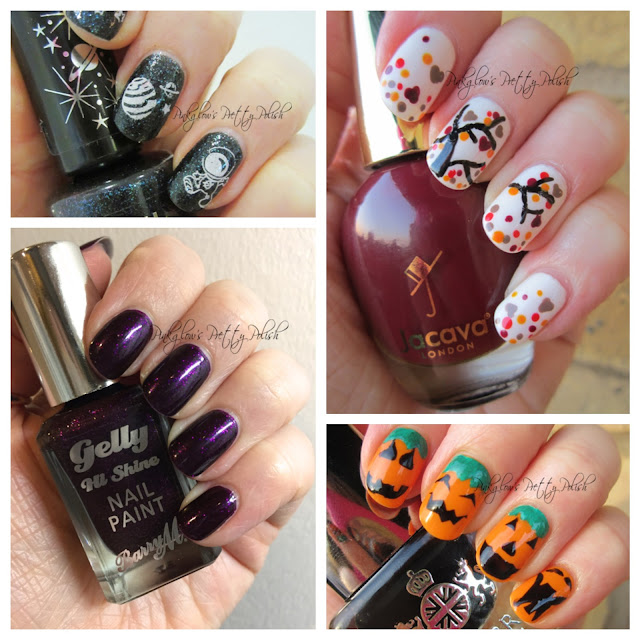
Autumn is my favourite month, I love all the changing colours and being able to snuggle up in cosy hoodies and boots.  I also love darker nails.

October-monthly-mani-favourites.jpg

At the start of the month I went to see The Martian, so I decided to do some space nails.

Astronaut-stamped-nail-art.jpg

Now I know that The Martian is about Mars, and that Mars is the red planet, but I thought that it was pretty fitting to use Rimmel's Space Dust in Total Eclipse polish for this manicure.  I love the MoYou Sci-Fi stamping plates, and this little astronaut is just so cute.

Barry-m-sparkling-amethyst.jpg

Barry M got it spot on with their limited edition glitter Gelly polishes, and I just couldn't resit them.  This is Sparkling Amethyst, and it's just stunning - I think it's made it's way into my list of favourite polishes.  I love the subtle glitter and beautiful shine of the Gelly formula.  I also got Sparkling Ruby, which will be making it's way into Christmas designs.

Falling-autumn-leaves-nail-art.jpg

As I said before, I love the changing colours of the autumn leaves, so really wanted to do a manicure to reflect them.  I remembered that I had come across this design on Pinterest a while a ago and it gave me the inspiration for my falling leaves design.  I used Graffiti Nails Tuscany, Barry M Mushroom, and Bright Red, and Jacava Cherry Brandy for my autumnal colours.  I added in quite a few more dots and falling hearts than in the original design, and was worried that I might make a mess when drawing the tree, but I was really pleased with my design and it was my favourite this month.

Halloween-pumpkin-nail-art.jpg

I think it's part of nail law that in October you must do at least one Halloween design.  This year I had order some brilliant nail vinyls from She Sells Sea Shells, so it made my pumpkin nails really easy to do.  Tuscany from Graffiti Nails was the perfect base.  I got Taxi Cab from True Brit London and Queen Victoria Street Nails Inc, in my Nailbox subscription and both were perfect additions.  I think my pumpkin leaves look a bit more like hair than leaves, but they are still cute overall anyway.

Do you agree with my favourite this month or did you prefer one of my other designs more?  Make sure you follow me on Instagram to keep up with me weekly.

Thanks for stopping by
Aimée x

Wednesday 30 September 2015

September - Pinks, Purples, and Glitter

Looking back over the past month I seem to have used lots of pinks, purples, and glitter, but hey, I'm not complaining.


Purples and pinks are my favourite colours so I'm not surprised that a had a whole month with a similar colour theme.

I started with Morgan Taylor's Bright Side with a glitter gradient.

Morgan-taylor-bright-side-reverse-glitter-graidient.jpg

Bright Side is a beautiful neon pink which dries to a matte finnish.  I used two coats here and you do need at least two coats as it's very streaky with just one.  I then used Holographic top coat from Nina Ultra Pro.  This has to be amongst my favourite glitters.  It catches the light and is jam packed with loads of sparkles.

Accessorize-glass-slipper.jpg

During the month I was lucky enough to be sent some new colours from the Jacava Woodlanders collection to review, which you can see here.  I wore the grey base for a little while before I couldn't resit covering it in a coat of this super sparkly glitter, Glass Slipper from Accessorize.

Autumn-stamping-and-sparkle-nail-art.jpg

This is my favourite design I have done in a while.  I have been doing some more simple things lately so decided to have a bit more fun with this one.  Being in a Autumn kind of place with another colour from the Jacava Woodlanders collection, I stamped some cute leaves and added some glitter and nail studs to match the theme.  I used Models Own Utopia for the base of the stamped nail and the golf glitter is Bora Bora, also from Models Own.

Sinful-show-off-with-silver-chevrons.jpg

Last month I signed up to Nailbox, but just missed the cut off for the August box, but the September box was worth the wait.  I got this amazing Sinful Pro Shine polish, Show Off.  I was drawn to it like a moth to a flame when I opened the box so had to try it straight away.  I had placed an order a She Sell Sea Shells for some Nail Vinyls so thought that I'd try them out for some fun chevron accent nails with Turn On The Haute Light from OPI.

Do you have a favourite colour you find yourself reaching for all the time?  What colours are you loving this Autumn?

Thanks for stopping by
Aimée x

Friday 18 September 2015

Jacava Woodlanders Collection AW15* - Jacava Competition Announcement

Jacava have gone and done it again - they have released seventeen brand new shades in their Autumn/Winter 2015 collection and they are bar far my favourites out of their entire range.  Autumn is my favourite season and I am partial to a dark nail, so when I was asked to review some of the new shades I jumped at the chance.  Make sure you read on to find out about Jacava's competition to win all 17 Woodlanders shades!

Jacava-woodlanders-AW15-review.jpg

*Press sample - sent to me for review

Monday 31 August 2015

August - Colours and Designs

You may have read in my previous entry that my posting schedule was going to change and the end of August brings my first round up of what I have been up to.


Overall I kept things quite simple this month, which gave me the chance to try out some colours that I hadn't got round to using yet, and some new colours that just happened to fall into my basket whilst out shopping.

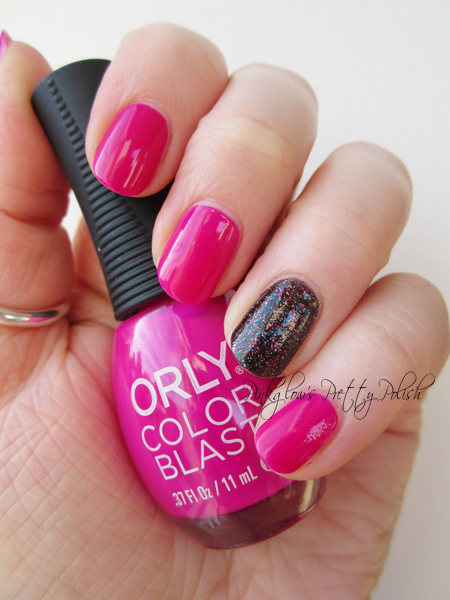
At the beginning of the month I got my first Butter London polish so, of course, I had to try that out right away, and I paired it with a beautiful new Orly colour as well.

Orly-fluorecent-fuchsia.jpg

I started with Fluorescent Fuchsia from Orly, as my main colour and used The Black Knight from Butter London as an accent nail.  Orly polishes that I have tried before have a lovely smooth application and this is no different.  With it being a florescent colour it dries to a matte finish, but I simply used my normal top coat to as shine.  The Black Knight is opaque in two coats, which also means you get a good helping of glitter.  The glitter particles are tiny pink and blue flecks, with even smaller gold sparkles running throughout.

Space-nails.jpg

I have really been enjoying watching the International Space Station fly recently, so I thought I'd do some nails inspired by watching the night sky.  I started with a base of Essence It's Raining Me, which has a subtle shimmer so it seemed like an appropriate colour to start with.  For extra stars I added a coat of Disco Ball from Rimmel because it has varying sizes and colours of glitter giving the idea of distant stars in the sky.  To finish off I stamped the ISS and The Plough constellation from my MoYou Sci-Fi 03 plate.

Summer-gradient-with-love-hearts.jpg

I hadn't done a gradient in a long time so thought I'd crack out some nice summer coral shades so this one.  I started with a base of white to make the colours really pop and then sponged on the gradient with a make up sponge using Model Own Peach Melba and OPI Toucan Do It If You Try.  I smoothed it all out with a glitter top coat and then added small white hearts with my dotting tool.  I got lots of compliments with this design.

Models-own-blue-spray-artstix.jpg

I have had a busy few days towards the end of this month so I used my limited nail painting time to try out Models Own Blue Spray which I've had for a long time, but never used.  The Artstix from Models Own are a really brilliant idea meaning that you have a colour and a glitter polish all in one. You can use just the base colour or just the glitter, or both together.  Blue Spray is made up of Blue Maldives and Sea Spray which you used to be able to get as full sized polishes, but I think they have now been replaced by other collections.  The Sea Spray glitter has silver bar shapes, red glitter dots and large diamond holographic flecks that really catch the light.

Barry-m-fuchsia-generation.jpg

Lastly this month I tried out Barry M Sunset nail paint.  This is another new one, but I didn't even put it in my basket... It was my fiancé, so I don't feel guilty about the purchase - ha ha!  When I first read about the Sunset collection I wasn't sure that the daylight curing finish would be much different from a gelly, but it does feel different somehow, plus, look how pretty Fuchsia Generation is.

Which has been your favourite design of mine this month?  Make sure you visit my blog again at the end of next month for my next round up, but in the mean time keep up with my designs weekly on Instagram.

Thanks for stopping by
Aimée x 

Friday 31 July 2015

Changes on Pinkglow's Pretty Polish


I have been taking some time to think about my blog and how it works for me.  I have always said that it's something that I do for fun and I want to make sure that it stays that way.  Recently I have begun to get fairly busy and have been feeling that my blog has been a bit more of a chore at times. 

To combat this I have decided that for the time being I will still be posting, but just not as often.  My blog posts will move to a monthly round up of my nails and the designs that I have been doing.  You will still be able to keep up to date with me week by week over on Instagram as I will continue to share all the pictures there, just be sure to stop by at the end of the month to find out a bit more about each design on my blog.

The exception to this will be if I am asked to do a review, in which case I will be doing an individual post for that.

I look forward to continuing with my nails but not pressuring myself week on week.

Thanks for stopping by and I hope to see you back again at the end of next month
Aimée x

Monday 27 July 2015

Lady Queen Water Decal Review*

As I'd done something quite simple with my nails last week I fancied doing something fun and colourful, and luckily as I was coming up with some ideas I got some exciting nail mail.  I was contacted by Lady Queen.com a little while back and they asked if I'd like to review some of their nail goodies.  I chose some rainbow geometric patterned water decals and some gold bow nail gems.

Lady-queen-water-decals-1.jpg

*Press sample - sent to me for review

Monday 20 July 2015

Short and Simple

July has been very busy so far, and it's not slowing down yet.  I found out at work that I had to move offices so I didn't want to spend too much time doing anything fancy with my nails in case they got chipped.  I also thought it would be best to file them down a bit, to avoid breaks.

I really liked the pink ombré that I did a few weeks back, so thought I'd go for the same style again but with purples.

Purple-ombre-nail-art.jpg

I used the following colours, from thumb to little finger, Models Own Pitch Purple, W7 Liberty, Models Own Pear Purple, Revlon Colorstay Winning Streak, and Essie Full Steam Ahead.

Whilst I was doing my nails my mum was visiting.  She asked me to file her nails down and sort out where she had some splits and damage.  I filed them quite short so they all matched.  She then painted them with Morgan Taylor Sugar Fix so that they were still protected by some polish to avoid breaks, but so that the colour wasn't too dark.  For a bit of fun I added a pretty flower with gems from the Born Pretty Store as an accent nail.

Gem-flower-nail-art.jpg

Only a short little post this week, but I thought you might be interested to see mine and my mum's short and simple nails.  What do you do if your nails need a bit of TLC or protection?

Thanks for stopping by
Aimée x

Monday 13 July 2015

Coloristiq July Manicure Box - Summer Getaway - Swatches, Review, and Nail Art Tutorial*

The lovely ladies at Coloristiq contacted me a little while back and asked if I'd like to put together a tutorial for their July Summer Getaway Manicure Box.  It took me all of a few seconds to say yes.

I got the lovely gold box through the post filled with gorgeous polishes worth almost a whopping £50 and started planning my design to fit the theme.

Coloristiq-summer-getaway-bottle-shot-2.jpg

*Press sample - sent to me for review

Monday 6 July 2015

Nail Swap with The Naily Mail - Featuring a review of Just My Look*

A while ago Lauren, from The Naily Mail, and I were contacted by Just My Look about reviewing some of the lovely nail polishes that they have available on their website; but these were to be reviews with a bit of a twist... We would be picking the colours for each other.  Needless to say we took up the offer, so today I have OPI Tocan Do It If You Try*, OPI That's Hula-rious!*, Morgan Taylor No Way Rosé*, and Morgan Taylor Sugar Fix* to show you.

Lauren and I have also done a nail swap using our new colours.  Here's clue about which design I chose - any guesses?  Read on to see the swatches and finished design.

Mosaic-nail-art-prep.jpg

*Press sample - sent to me for review

Monday 29 June 2015

Pink Ombré Nail Art

I think sometimes simple can be more effective, and that's what I've gone for this week with a pink ombré.

Pink-ombre-nail-art.jpg

I've done a similar look before with purple tones, but it was a long time ago now.  I think the colours that I picked this time around compliment each other much better and I prefer the light to dark ombré starting with the lightest shade on my thumb.  I think it looks more balanced.

From thumb to little finger I have used the following colours - Essie Ballet Slippers, Models Own Strawberry Tart, Barry M Strawberry Ice Cream, Revlon Fuchsia Fever, and China Glaze Traffic Jam.  To match the finish up on all the shades I've finished with a coat of Collection Sparkle Top Coat.

I've got some exciting reviews and a nail swap coming up on my blog so keep an eye out for those soon.

Thanks for stopping by
Aimée x

Monday 22 June 2015

Choose Happiness Coca Cola Inspired Nail Art

If you're anything like me you will spot nails from a mile off, whether that's because they are nicely painted, sporting a bit of nail art, or the more upsetting flipside of this, all chipped and sad looking.

Well, I was watching TV the other day and the adverts came on, so it was a perfect opportunity to scroll through my social media feeds, but I happened to spot nail art in one of the new Coca Cola adverts.  It's only on screen for a fleeting second or so, but never the less there it is, so I decided to recreate it.

coca-cola-choose-happiness-nail-art.jpg


To make this nail art even more fitting I used OPI Coca Cola Red - how could I not?  My thumb, middle, and little fingers are Coca Coal Red with black spots and my index and ring fingers are the opposite.  I used Graffiti Nails Jet which is one of the best black polishes I've used.  I tend to find that some blacks are a bit patchy, especially on the first coat, but Jet is so opaque, and glides on really smoothly.

coca-cola-choose-happiness-nail-art-2.jpg

Where do you get your inspiration from?

Thanks for stopping by
Aimee x

PS I've embedded the video below so you can see the original.  It's part of Coca Cola's #choosehappiness campaign.


Monday 15 June 2015

Revlon Colorstay Gel Envy: Winning Streak with Dry Marbled Hearts

I was a very lucky girl and I got a happy Friday present last week from my fiancé - he brought me home a pretty bottle of purple goodness!  Otherwise named, Revlon Colorstay Gel Envy in Winning Streak.

Revlon-colorstay-gel-envy-winning-streak.jpg

This is such a pretty colour and the coverage is amazing.  I could have left it at one coat if I wanted, but I had in mind to try out this dry marbling to create some pretty hearts.  I first tried this technique out on my Valentine's Day nail art wheel which you might have seen over on Instagram back in February.  This is so easy to do, but I love the finished effct.  All you have to do it paint on another coat of your base colour, add a row of dots in a contrasting colour whilst the base it still wet and then drag a thin nail art brush down the middle.

You can use this technique for more complicated marbled designs as well.  Madison over at Fundamentally Flawless has some great designs and I loved the swirl design she did at Christmas as part of her Advent Calendar.

The two purples I chose mix together beautifully to create the hearts.  If you don't have a thin nail art brush you can use a toothpick or a pin.  Just be careful that you don't drag the polish too hard otherwise you could end up creating bald spots on your nails.  Also you do have to work quite quickly, but if you have a bit of a practice first you'll get the hang of it quite quickly.  If you leave the dots of polish too long and they dry when you drag them together you'll end up wrinkling your polish.

Thanks for stopping by
Aimée x

Monday 8 June 2015

Models Own: Colour Chrome Stamping

I know the Colour Chrome collection came out a while ago now, but I haven't actually had time to try them out yet.  I have to say, whilst they are pretty, they weren't my favourite collection from Models Own so I only bought two as they were my favourites out of the 10 available.

Models-own-utopia-and-chrome-cerise-stamping.jpg


I have read loads of blogs where everyone has said how brilliant chromes are for stamping, so I thought I'd give it a go myself.  I chose my MoYou Sci-Fi 08 plate which features funky whole nail designs.

MoYou-Scifi-plate-08.jpg


I have mainly seen the chrome collection stamped over black, which looks lovely, but black nails are a bit heavy for summer, so I picked a neutral base, Utopia, also from Models Own.  I paired this with Chrome Cerise for my stamped design.

If you have used stamping plates before you'll know that you can't hang around when picking up your design, and I found that the chrome colour dries really quickly, meaning I had to work even faster than normal.  Unfortunately this meant that I have a couple of little patches where the whole design didn't quite transfer, but I'm not going to tell you which nail in case you haven't noticed!  The large dots in the middle of my chosen design weren't as sharp as I would have liked them to be, but to fix them I used a small dotting tool and dotted over them.  I tend to find that the whole nail images on MoYou plates are not quite long enough for my thumb nails unless I have really short nails, so I used Chrome Cerise over the whole nail as a bit of a contrast.

Models-own-chrome-cerise.jpg


Overall I did like the colour for stamping and I think the finished effect is lovely, but have to say that I am not keen on the over-all chrome finish.  There are far too many visible brush strokes for my liking and they aren't very forgiving on any little imperfections.

Thanks for stopping by
Aimee x

Monday 1 June 2015

Nails Inc with In Style Magazine

Whilst shopping at the weekend I noticed that there were lovely Nails Inc polishes in with In Style magazine, so I would have been silly to walk away from such a good offer.

Nailsinc-the-tide-is-high-with-magazine.jpg

There are four different colours to choose from, but I was good and just picked up one, The Tide is High.  It's a really pretty minty greenish blue.

I had a pretty busy weekend as I was wedding dress shopping (yay - so exciting!), but it did mean that I didn't have much time to do anything too fancy with my nails, so I thought I'd try this colour out.

Nailsinc-the-tide-is-high.jpg

It's a really pretty colour and will be brilliant over the summer.  I find it really difficult to leave nails plain so I added a coat of Models Own Micro Dots over the top, which I think works really well as the green flecks in it really compliment the base colour and the rest give a nice contrast.

Just a quick post this week, but I have an exciting nail swap coming up soon, so keep an eye out for that soon.

Thanks for stopping by
Aimée x

Monday 25 May 2015

Pastel Galaxy Nail Art

I have got back into the swing of more detailed nail art over the past few weeks.  I have been doing some more simple things recently, and whilst pretty, I haven't felt overly inspired.  This week I decided to break out lots of shimmery pastel colours and some brights to create a fun pastel galaxy.

Pastel-galaxy-nail-art.jpg

I had always thought galaxy nails would be difficult to do, until I had a go myself using more typical purple shades.  You can see them here.  This time around I wanted to try them them in more spring friendly colours, so as I said, I raided my shimmers and brights to see what I could come up with.

Monday 18 May 2015

Dotty Flower Nail Art

I have been lacking inspiration for nail art recently so I thought what better way to get some ideas than by browsing through my Pinterest boards to be inspired.  I fancied using blue as my main colour so at least I had a starting point.

Essie-bikini-so-teeny-flowers-and-dots.jpg

I came across this lovely design by @naildecor (on Instagram) which I had pinned quite some time ago, but thought it was perfect.  I didn't copy it like for like, but really love the combination of blue, white and silver.  

I started with Essie Bikini So Teeny on my thumb, index finger, and thumb.  Its quite a thin formula, so I used three coats to get full opacity.  For the white base I used Models Own Snow White and then used a medium dotting tool to create my flowers and dots.  I started with the silver centres for the flowers so I could position them where I wanted, then I went in with the blue for the petals.  I added in random silver dots with OPI Turn On The Haute Light once the flowers were finished to fill in the spaces.  I was really pleased with these, and I got lots of lovely compliments.

Hopefully this will get me back into the swing of things with some better nail art soon.  Have you tried any new techniques recently that you'd recommend trying out?

Thanks for stopping by
Aimée x

Monday 11 May 2015

Pretty in Peach - Sparkle and Studs Nail Art

I wasn't sure what I wanted to do on my nails this week, and when that happens I always find that going for something simple is the best plan.  I had seen a peach manicure whilst scrolling through social media and the colour just stuck with me.

Models-own-peach-melba-glitter-and-studs.jpg

I chose Models Own Peach Melba from the Fruit Pastel collection and can't stop smelling my nails.  Overall I'm not sure if it smells like peaches, because I can't remember the last time I had a peach, but it's a pretty scent anyway.  I would say, if I had to, that it smells a bit like a fruity sorbet.

I paired this with Crystal Glaze from Barry M.  This is such a pretty topper.  The flecks of iridescent glitter are so subtle but give a really lovely shimmer when they catch the light.  I then finished off my whole manicure with small gold studs at the base of each nail.

Just a quick post this week.  I hope to get back to some more detailed nail art soon.

Thanks for stopping by
Aimée x

Monday 4 May 2015

Coloristiq Nail Polish Rental Service Review*

Do you ever see nail polishes that you'd love to try, but their price tag is just a little to steep for you to justify buying the whole bottle for perhaps only a few uses?  If so, it sounds like you could benefit from Coloristiq's nail polish rental service.

Coloristiq-nail-polish-rental-china-glaze.jpg

*Press sample - sent to me for review

Monday 27 April 2015

Pink Dot Pond Manicure

I really enjoy scrolling through my social media feeds on Twitter and Instagram and seeing all the lovely manicures other people have been trying out, and in the last few days I have been seeing a few pond manicures pop up here and there and just had to have a go myself.

Models-own-pink-fever-Pond-manicure-with-pink-dots.jpg


When I was looking at my polish collection I couldn't find anything quite sheer enough to get the right look.  I decided to use Models Own Pink Fever which is quite sheer with one coat, but when you build up further coats it wouldn't work effectively for this technique.  Using an empty polish bottle I mixed my colour with clear top coat to create something more sheer.  For the dots I used my Mo You stamping polish in White Knight.  The opacity of the stamping polish made it a perfect choice as I knew it would be visible through the rest of the layers.

To start I applied one thin coat of my new sheer pink, and then added on white dots in varying sizes. When this was dry I added another thin coat of pink and white dots.  I continued this process for about four layers.  I love the depth this technique gives.  As you build up the layers the dots gradually change in colour getting darker with each layer giving an ombré effect using only two colours.  I have tried overlapping dots like this before using different shades of a colour and it has always ended up looking messy, but I think the depth makes all the difference here.  I decided to leave the last dots white to make it look as though they were floating on the top layer.  I also thought that another layer of pink might have made the first lot of dots blend in too much.

I really like this technique and want to try it again with something more complicated than dots so I'm on the lookout for some nice sheer colours.  Any suggestions?

Thanks for stopping by
Aimée x

Monday 20 April 2015

Neon Flower Nails

We have been treated to some beautiful summery weather recently in London so I thought I would match my nails to the bright weather.  I skipped right over the pastels for this one and looked at the brighter polishes in my collection.

Essence-let's-get-lost-and-neon-nail-studs.jpg


In the end I opted for Let's Get Lost from Essence as my base.  You could almost get away with one coat of this polish as it's really pigmented, but I always tend to prefer two coats anyway.  I really like the brushes in these bottles because they are flat with rounded tip, so you get a really good coverage in just a few strokes, but I find I have to be careful not to flood polish at the sides of my nails.

To add the extra bright factor to my design I used neon studs from the Born Pretty Store as petals for flowers.  I added a small dot of yellow polish as a guide for the centre of the flower and then painted a thick coat of top coat over the whole nail.  Whilst it was still wet I carefully pushed the studs onto my nail, sticking them in the wet top coat.  To pick up the studs, I used an orange stick with a small bit of blu-tack on the end shaped into a point.  Once I had finished the placement, some of the studs covered up the yellow for the centre of the flower, but nothing another dot of yellow polish in the centre wouldn't fix.  I couldn't decide if I wanted to add a flower to all of my nails, so I worked from the outside in, and when I had finished the pink flower I really liked the accent feature I had created and thought that any more might spoil the look.  What do you think?

One thing to note is that the ends of these studs do lift away from the nail slightly, as they are flat, and nails are curved.  I added a thick layer of glossy top coat over my finished flowers to seal them in place and prolong the life of my flowers.

If you'd like to get these studs, or anything else from the Born Pretty Store you can get 10% off using code HFG10.  You can see how I used the square ones from this wheel at Christmas here.  I particularly like this shape combination because there are so many different ways you could use them.

Thanks for stopping by
Aimee x

Monday 13 April 2015

Nautical Nail Art

I've often wondered about painting some nautical nail art, but have always decided against it, until now.  I think my main reservation has been that there seems to be a lot of similar looking designs around and I didn't want to create anything too samey; I wanted to do something a bit different and I hope that I have achieved that.

Nautical-nail-art.jpg


A while ago I bought some new stamping plates from MoYou including The Sailor 03 plate.  This is where I started planning my design.  I first chose the pattern that I was going to stamp, and worked from there.  Other nautical nails I have seen seem to use white, red, and blue as their main colours, but I decided that I just wanted blue and white.  I started off with a white base on all my nails and then stamped my waves with Barry M Blue Grape, on all fingers other than my ring fingers.  My original plan was to paint anchors on the plain white base to go with the waves, but then I remembered that I had some anchor nail tattoos left from when I reviewed Fake Tattoos Nail Tattoos.

I thought a single anchor on a plain white base might look a bit lost, so I added a large sized tattoo to my thumb nails and then smaller sized ones on the rest of the nails with stamped waves, making sure to put them at different angles and positions on my nails.  I was then left with a conundrum with what to do with my accent nails as I had changed the design I had planned in my head.  I painted over them with two coats of Blue Grape and added three different sized gold studs from the Born Pretty Store.

I am not sure how I feel about this design overall because, once I had finished, I kind of wished that I had started with a blue base on all nails and stamped the waves in white.  Blue Grape is such an amazing colour I am not sure that the stamped design does it justice.  Having said that, I don't think the anchors would have showed up so well if my base had been darker blue, so there's benefits to both.  What do you think?

Thanks for stopping by
Aimee x

Monday 6 April 2015

My Top Three Nail Colours

Posts like this are really difficult to write because how, out of my collection of 192 colours, can I just pick three?  I figure that if I use a colour a lot that it must be a favourite otherwise why would I keep reaching for it over and over?

I whittled down my choice to these three beauties, and tried to include something for everyone, and to suit most budgets.  Also, they are all great for spring.

Top-three-nail-polishes.jpg

Monday 30 March 2015

OPI Spotty Nails

When I went away in December I thought it would be silly not to stop by the duty free to see what nail goodies I could find and I came across the travel exclusive OPI  Coca Cola set.  It comes with 6 mini bottles of beautiful colours.  I have used a few of the colours so far and really like them, but this is the first time any of them have appeared in a blog post.

OPI-spotty-nails.jpg

Monday 23 March 2015

Pastel Strawberry Nails

I'm just popping by quickly to show you my fun spring nails.  The sun was shining so what better way to celebrate than cracking out the pastels again?  I decided on Models Own this week.

Pastel-strawberry-nail-art.jpg

Fruit nail designs are generally quite straight forward but always look cute.  I chose Strawberry Tart scented polish so thought it would be very fitting to paint my nails to match.  I used Jade Stone and Lemon Meringue, both from the Ice Cream Sundae collection, to finish off my strawberries.  I added little leaves at the top of each nail by my cuticles using a small dotting tool, and then used a tooth pick for the strawberry seeds.

What fruity designs do you like to do?

Thanks for stopping by
Aimée x
Monday 16 March 2015

Watercolour Tie-Dye Nails

I decided to try out a new technique this week but it didn't work to plan, so I had to change my idea part way through painting.  Luckily I didn't have to start all over again and I am really pleased with the outcome.  I have ended up with a watercolour tie-dye effect.

Watercolour-tie-dye-nail-art.jpg

I started off with a neutral base so I had something to work on, and I was originally going to add watercolour bubbles, but I'm not sure that I worked quick enough to soak up the excess polish to give the right effect, so thinking quickly I started adding my watered down polish in splodgy sections over the whole nail.  The colours started blending together really nicely.  I added a few layers to build up the colours and cover any bare patches.  To even out the sections I added a fine glitter top coat from Collection.  A adore this top coat as it transforms any polish into something extra special.

I used Tuscany from Graffiti Nails which has to be my favourite orange polish I have come across. The pink is Gumball from Models Own, so not only are my nails pretty, they smell yummy as this is a polish from the Sweet Shop Collection.  Lastly I have used Yellow from Barry M.  I think all these colours work together beautifully.  What do you think?

Even though this wasn't what I originally had in mind, I think the effect I am left with is fun and eye catching.  And it's a different way of creating this look, rather than water marbling or dragging the polish when on the nail.  What do you do when a design doesn't quite to plan when you have already started painting?

Thanks for stopping by
Aimée x

Monday 9 March 2015

Pastel Chequered Ombré Nail Art

We were treated to some lovely spring weather over the weekend, and spring always has me reaching for pastel colours.  Who else is excited for pastels?

There have been some gorgeous new releases recently, fuelling our polish addictions, but not being quite so good for our bank balances!  Having said that I have managed to resist most of the new ones recently as there is a particular collection I have my eye on, so this week I looked through my already rather large stash to revisit some old favourites from Models Own.

Pastel-chequered-ombre.jpg

I opted for a white base with a combination of Beth's Blue, Lilac Dream, and Pastel Pink.

Beth's Blue has been a long time favourite pastel shade for me and unfortunately you can't get it any more, but there are some other similar beauties in the Hypergel range and also Blueberry Muffin. You can also see my comparison of this against Duck from the Speckled Eggs collection.

Using my MoYou Princess 10 plate meant that this was a really quick ombré without loosing any of the effect.  I have already had lots of compliments and questions as to how I got the look.

Confession time, I haven't got the checks on thumb nails.  I used Lilac Dream for those as I just can't seem to stamp very well on my thumbs with an all over design like this.  I thought it might look a bit odd, but it actually ended up being quite a cute, if not traditional, accent nail.  When I try all over stamps like this pattern I end up with bare ends where it hasn't been quite long enough and you can never get it to line up properly to try to add an extra bit on the end.  Does anyone else have this problem?

What pastel colours are your favourites for spring?

Thanks for stopping by 
Aimée x

Monday 2 March 2015

Elegant French Manicure with Born Pretty Store Water Decal Review*

Evenings are finally staying a bit brighter, and there are daffodils and crocuses coming out, this can only mean one thing... spring is upon us.  Since the beginning of the year I have mainly stuck with darker colours so I thought it was about time to do a lighter manicure.

I was trying out some different Essie nude shades at the weekend and thought that these colours lent themselves to showing off these pretty Black Flower Water Decals from Born Pretty Store.


*Press sample - Sent to me for review

Related Posts Plugin for WordPress, Blogger...